Colt SAA case lid -plaque

Joined
Sep 7, 2010
Messages
25
Location
Mittagong Australia
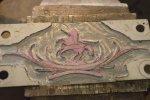
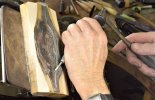
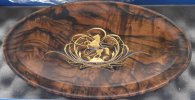
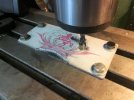
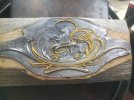
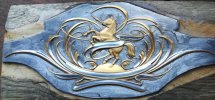
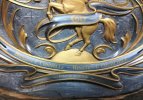
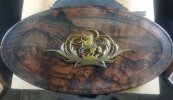
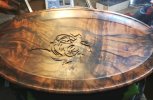
Fitted inside the lid of the Colt SAA that I engraved with Winston Churchill. Starting with 1/8" mild steel plate, designed, drawn, machined for depth, chiselled, filed and ground before 24ct gold inlay and a big cleanup job. Sawn out with No2 jewelers blades, niter blued, and inlayed to the Turkish walnut oval. Secured from the back with 20x1.2mm screws.
 

Attachments

  • _DSC1244-1150x768.JPG
    _DSC1244-1150x768.JPG
    122.5 KB · Views: 172
  • _DSC1250 (2)-1189x768.JPG
    _DSC1250 (2)-1189x768.JPG
    119.7 KB · Views: 166
  • _DSC1256 (2)-1494x768.JPG
    _DSC1256 (2)-1494x768.JPG
    113.7 KB · Views: 170
  • IMG_20190912_182637 (2)-1024x768.jpg
    IMG_20190912_182637 (2)-1024x768.jpg
    109.5 KB · Views: 164
  • IMG_20191109_141930-1024x768.jpg
    IMG_20191109_141930-1024x768.jpg
    138.3 KB · Views: 161
  • IMG_20191218_145432-1649x768.jpg
    IMG_20191218_145432-1649x768.jpg
    133.3 KB · Views: 168
  • IMG_20200108_170135 (2)-1024x716.jpg
    IMG_20200108_170135 (2)-1024x716.jpg
    146.3 KB · Views: 173
  • IMG_20200110_180001 (2).jpg
    IMG_20200110_180001 (2).jpg
    113.2 KB · Views: 183
  • IMG_20200112_200620 (3)-1323x768.jpg
    IMG_20200112_200620 (3)-1323x768.jpg
    87.7 KB · Views: 178
  • IMG_20200114_184728 (2)-1173x768.jpg
    IMG_20200114_184728 (2)-1173x768.jpg
    123.8 KB · Views: 184

T.G.III

:::Pledge Member:::
::::Pledge Member::::
Joined
Jul 25, 2009
Messages
344
Location
Oregon
Worthy of a masterpiece, thank you for taking the time to share.
 

RonFinch

New Member
Joined
Nov 3, 2011
Messages
3
Location
Lancaaster,Pa.
Wow, Wow, oh wow! That took some time and skill. The fit to the wood is incredible, let alone the design and execution of the design. Thank you for sharing. So what about a couple of pictures of the SSA?
 

mitch

~ Elite 1000 Member ~
Joined
Jul 23, 2007
Messages
2,635
Spectacular, Damien! Would you mind telling us about the order of work, in particular, the pros & cons of completing the engraving almost 100% before sawing out the piercing?
 

Sam

Chief Administrator & Benevolent Dictator
Staff member
Joined
Nov 6, 2006
Messages
10,490
Location
Covington, Louisiana
Damien, that is just the most amazing piece of work ever!! Mind blowing!!
 

707chrisa

Member
Joined
May 11, 2021
Messages
59
Location
Humboldt Ca.
Ah so that's how it's done (not that I could do it ) all ways wondered how one would keep it all from distorting . Looks like a ton of work nicely done!
 
Last edited:
Joined
Sep 7, 2010
Messages
25
Location
Mittagong Australia
Thank you, very much all you commenters. It's so gratifying, and many of you would know this, when the risks we take have panned out, and the result is appreciated by our peers.

Mitch, thanks for your interest, and for those wanting to know a bit more; seven years ago I drew the first version of this plaque, and the planning sort of bubbled along since then. For me, it needed to, because unless I know every step in the process before I start, this sort of thing will go off the rails.
I can heavily and reliably undercut a 8 thou. wide inlay trench. My gold relief must overhang the trench sufficiently that I don't cut the dovetail off when sawing out. That makes the narrowest line maybe 15 - 20thou wide. After roughing out relief on the mill, I pounded the design plate into an oak block to get the bowl shaped curvature to match the oval walnut panel.
There is close to two ounces of gold in this, and in places along the ribbon edges it stands about 2mm tall and a 1mm wide, dovetailed in at the base, and also held with undercuts to the vertical wall it stands against. On the dome, and on the horse, the gold started at 45 thou. thick, and is attached by every undercut and dovetail I could devise. I used many strange, and almost one off punches, and combinations of them to allow me to retain the bulk of gold where I need it, while ensuring that it is fully extruded into the dovetails and undercuts. Heavy chisel cuts in the floor of every trench limited sideways spread. I used a much bigger hammer too!

The dim possibility of meaningful work on the design after sawing out meant I had to complete nearly all work before sawing out. Once sawed out though, I pressed, bent, and pushed the design to an intimate fit with the surface of the wood so I could scribe it accurately, before I inlet the design.

Ideally, I would cut the perfect cavity, no trial fits, and just drop the design in. I tried my very hardest to do that, get it right first time, because to trouble shoot the tight spots on a complex piece is hard. I didn't come close of course, but with inletting blue and chalk I held the fitting to a minimum. Lots of work siting, marking, drilling, and tapping the twenty 1.2mm attachment screw holes, with the smaller tendrils having doubler plates silver soldered on for strength around the screw hole. (Don't melt the gold inlay!) The wood needs to be finished with no finish in the inletting - good luck, and a decent finish bought up without dishing the inletting edges. That's tricky and only somewhat successful.

Lots of gold lying and flying around larger inlay jobs, and I gave up being too careful. So, at the end I swept the bench and floor very carefully, and panned nearly 20grams of 24ct gold!
 

Brant

Elite Cafe Member
Joined
Feb 6, 2014
Messages
198
Location
Weeki Wachee
Damien, All I can say is WOW. You are obviously one of the most patient and skilled engravers on this planet. Thank you very much for sharing your beautiful art and taking the time to explain how you go about you work.

The results are stunning. You have opened my eyes and mind to realize what is physically possible, but for most not possible to achieve due to lack of patience and ability.

Again, thank you for sharing.

Brant Emery
 

mitch

~ Elite 1000 Member ~
Joined
Jul 23, 2007
Messages
2,635
I pounded the design plate into an oak block to get the bowl shaped curvature to match the oval walnut panel.
So you're saying it's not flat, it's got a domed curvature, too??? Oh, excuse me, now that I know what I'm supposed to be seeing, it's not a convex dome, it's a concave dish. The curvature is very subtle and not immediately obvious in the photos unless one is looking for it. Do you have any shots of a more extreme side view? Did you lie awake nights trying to figure how to make this project as complicated as possible?

And I appreciate what you're saying about inlaying right to the edge of a part. I've done a couple custom pistols that have a moveable joint between the upper surfaces of the slide and an integral raised section of the barrel. It's hard to describe without drawing a picture of the cross-section, but where they meet one edge is 135 degrees, but the opposing side is only 45deg. Inlaying right to the adjoining edge on the 'fat' side is no big deal, but on the 'skinny', acute angle, it's a bit of a challenge.

thanks again for sharing this masterpiece...
 

Latest posts

Sponsors

Top