For a first try it is o.k. But come on Mick, recognizable simply isn’t enough!
First polish your plates properly, they must shine.
Second, don’t use powered tools for this kind of engraving. As the plates are quite soft and the cuts extremely delicate, there is no need for power!
Grind yourself one or two fine, very sharp gravers. Start again and DRAW the full detailed image in steel. Use the tool any way you need to reach naturalistic expression. Allow yourself at least 12 hours of engraving work for such a tag.
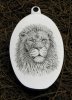
Here is an example of my student Karin Höllhuber. The first picture shows the work in progress, fine dots mark the main lines. Note how different the cuts must be in order to create the desired effect!
Go ahead and let us see what you have reached!
Martin,
That was very good advice you gave Mick, and I liked the black Lab that you did. You must be very proud of your student Karin. The anatomy of the lion is superb. Keep up the good work. Anyone who studies under you is very fortunate.
Well done for a first atempt. You've just done the easy part, now you have to go in and start adding the detail and texture. As Martin has pointed out to you this is the most time consuming part of the job.............and the most rewarding. You get to see your dog come to life in front of your eyes. Go softly on the cuts and work from light to dark. You will end up recutting areas to make them darker and so on. Try to think of it as building up layers of shade and texture. Whatever you do don't try and get it all in one hit with a few rough cuts.
Be patient and take your time without rushing it. When you've done that I'd love to see a photo of the finished piece. The next one will be better and the one after that better still.
JJ Roberts,
Thank you. It is a pity that only few students fully realize the chance in time…
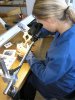
After finishing the pendant Karin Höllhuber engraved a knife which she made one year earlier. She decided on tigers and wolves. Please take a look at the pictures and see her engraving using an old Russian microscope without zoom.
Thanks for all the advice. At the time I was sitting at my bench and low and behold! there was a plate and some clip art pictures so I said what the heck, it's time to try a picture. Drew it on with pencil and started to cut. I'm sure with all the tips you all have given the next one will be better.
Thanks again
Mick
Respectfully JC.
American thinking? European thinking?
To paraphrase:-
'When I was a European I thought as a European."
"Now I'm an American I think as an American."
Different thinking, maybe.
In engraving is one wrong and one right?
I don't think so.
Both produce excellent results.
Engraving and engraving methods change slowly in Europe.
Are they wrong? No, just different.
Less slowly in the USA.
Are we wrong? No, just different.
Just my thinking.
John B.
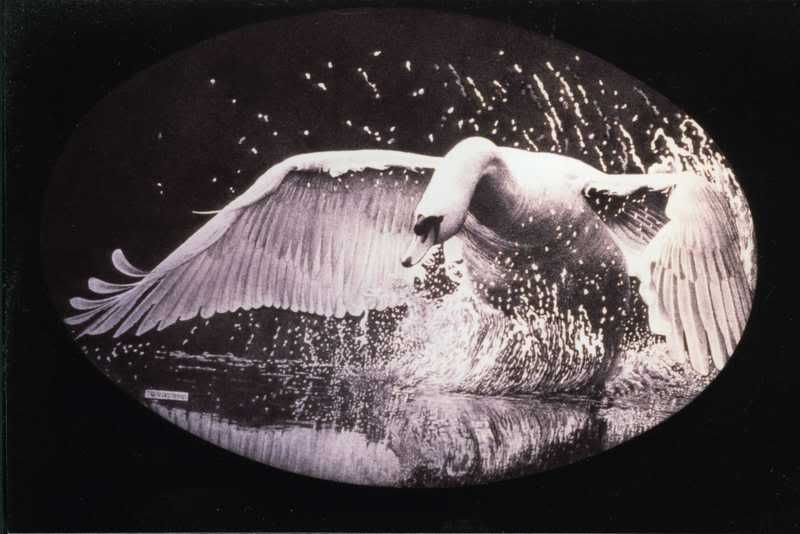
Respectfully, Here is an example of Francesca Fracassi's work. A small belt buckle.
As I recall she told me she used a scribe, a single point graver, an engraving block, a 3x5 card, a burnisher, a 10x jewelers loop and a north facing window for light. No power tools or aids.
The card has a opening cut in the center about 15x 20 mm. the card is taped over the work and only the area exposed in the opening is worked on at one time. I believe this is for concentration, and to avoid scratching areas not being worked on. My understanding is that she uses nothing but oil on the work when finished, no ink, no polishing, no abrasive.
There is an Article in the nov,dec Shooting Sportsman Magazine describing it further.
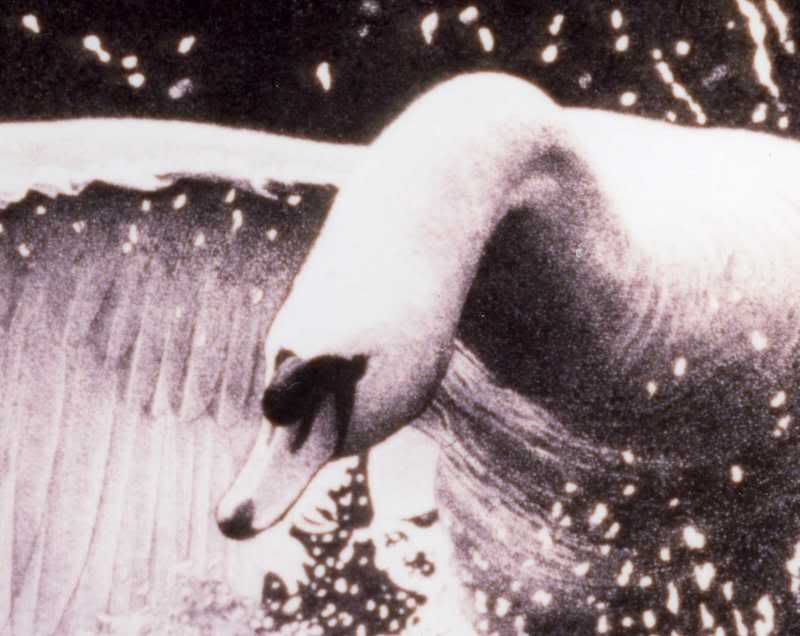
Wow Barry! Thanks for the great post of the swan buckle.
During your world travels you have met a lot of these great artists and gathered a fantastic amount of knowledge and wonderful pictures.
Thank you for taking the time to share both things with us all.
It is amazing to see what great art can and is produced with such simple tools.
Francesca Fracassi is an outstanding example of that thinking.
I don't know how technology would improve her work.
Best regards, John B.
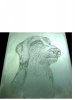
Here is a practice plate I did of a German Wirehaired Pointer. I use these practice plates at the gunshows so people can pick them up and look at them. When it comes working on animals and birds I do everything with a push graver, there is something about that graver beneath my hand. I would like to see more of Martin's students work, and how they use a hammer and chisel..whether they sit down or stand up working at a vise.
Hope this photo of this dog comes across okay. Also see the deer I am ready to put on a floor plate.
Every time I think I've seen the finest work imaginable, someone comes along and smacks me right between the eyes! I thought Ivo Fabbri was the most suberb master of bulino, until I saw this swan!!! I will take the word of the artist as to the tools, but it looks exactly like a Victorian Messotint etching. A messotint is created by first "roughing up" a metal printing plate with a "messotint rocker" which is a large curved blade with hundreds of tiny teeth on the edge. The plate is "rocked" in all directions with this tool until it prints completly black. Then, whatever image you want is burnished into the plate to remove the rough surface. This burnishing can be so finely controled that an expert can make a print that is photographic in subtle tonality. No harsh dots or lines are seen on the plate or subsequent print. That is what that remarkable belt buckle looks like. No disernable dots or lines! Awesome! I can't imagine how long it would take to do this degree of detail. As soon as I post this, I'm going to do a web search for other examples of her work.
J.C.,
Yes, I would like to have at least one state-of-the-art microscope in school! Although I do not believe that it would improve an engraving of a student, -not as long as mistakes can be seen under an old one.
The school I am teaching in is quite big. It is free for the students and run by the government, meaning that we have limited budgets. Each one of the 1100 students is costing us approx. USD 9000,- annually. Anyway, the engraving department is very small having a maximum of just 9 students per class. Therefore it is even harder for me to get a good piece of the modest annual budget, especially for relatively unimportant investment goods like fine optics. The schools Graver Max and Power Hone for example I could purchase because of a generous donation from Mr. and Mrs. Ilyashov, St. Louis, MO, the parents of iGraver member Rachel Ilyashov.
On the other hand I also teach CAD/CAM and CNC-engraving for making signs or minting dies etc. Hand engraving is not the most important or needed skill. Nevertheless, some students like it much and those receive a more intense instruction covering that.
As to hand vs. power: The smaller the cross section of the chip at the frontal face of a graver the bigger the pressure there. A clear conclusion of this is that powered engraving is best suitable when much pressure is needed and deep, heavy engravings are produced! This does not mean that I doubt that one can work very fine using it.
The pictures of your dog engraving shows two problems of powered tools. Even in areas where the dog has short hair, you have used long cuts for shading. The reason for this could be, -possibly- that short cuts are difficult to execute with a powered tool. It is my opinion, that in the end this machines influences the style of an engraving because of that property.
To get the chip out at the end of a line can be a bit tricky with a powered graver. Not so with the push tool. The white dots within darker areas seem to be such raised, polished particles left at he end of lines.
You are limiting yourself, if you only use powered tools! To confirm that I want to give some insight in shading techniques that can only be done without powered tools. Maybe you try and find them useful. (Please see the Tips from Cafe Members for this).
The overall impression of your engraving is good, but for me the dogs dark nose, mouth and ear are merging in with the also dark background, I think.
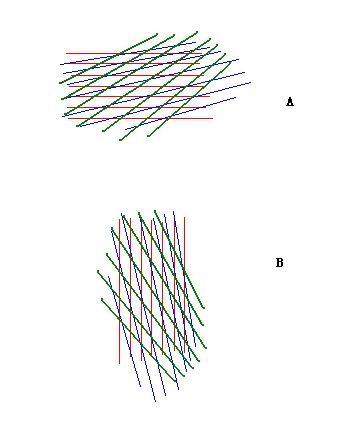
I got the dvd of Italy style bulino (by chris decamillis)a long time before ,but I still can not get the correct way.
As said ,I use very tiny crossed cuts to make the shadow.The black area can be seen in a special angle.
When I turn my work to the angle .The cuts in same direction will appear black .The cuts in other direction will not appear black ,it’s bright. I can not understand .
For example ,I cut 2 shadow area (area A and B)on the practice plate.
The shadow area is made up of 3 series of cuts.First series is marked with red line,2nd is blue and the last is green.
there are on one plate ,but the cuts are not in same direction.
When I turn the plate to the angle let the area A appeare black,I also want area B appeare black too,but area B will appeare bright in this angle.

 Husky.JPG60.2 KB · Views: 374