
Here’s a little overview of how one engraving is done. Of course there are many ways to achieve the same result, but this is what I use and it works for me.
This engraving was done for a DVD box that was a gift for a couple whose wedding photographer I was.
First off me and my dad brainstormed about 3 hours how to make the box. First idea was to make usual rectangular box, but we just couldn’t find a way to put the discs safely there and we definitely didn’t want to use any plastic parts for DVD holders. The problem was also that I had to fit 3 discs there. We tried to come up with a way to modify plastic boxes that hold 4 discs, but nothing was really good… Finally we came up with the simplest solution - circular tower. It was the easiest to build and probably looks most elegant too. Dad went off to build the box out and veneer it, I started to work on engraving design.
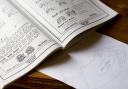
Design process usually starts with scanning the detail I want to engrave, in this case 12cm DVD disc, getting the contour lines in Photoshop and printing it out as big as possible, so I’ll have enough room to draw my scrolls and leaves. Then starts the creative process with pencil and lots and lots of eraser. I still rely heavily on the design book, it takes time and practice to learn it…
Drawing the design for this piece took about 4 hours, but I believe it will shorten as my skills improve. Fortunately this detail is symmetrical so I could draw only one side and later mirror-copy that to the other side. After drawing is finished with pencil it is redraw it with black pen, then I erase the pencil lines and the scan the drawing again.
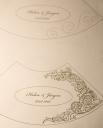
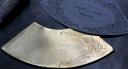
In photoshop I copy the design to the other side, enhance levels and whatnot, mirror the whole design, resize to correct size and print out several copies with laser printer so they can be transferred to the piece. Transferring is done with acetone on damp paper towel - I place the design face down (hence the mirroring in PS) on the metal plate and apply acetone to the backside. This effectively melts the toner on the paper and transfers it to the metal. On this photo the right side is already cut and left side shows toner marks.
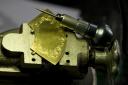
After the main lines are engraved it’s ready for shading and background treatment, both are very time consuming. Shading means just adding lots and lots of fine lines to the leaves that will give 3D look. For this project the background was stippled, which means just ‘destroying’ the negative space areas with needle-point tool.
Here’s the stippling tool attached to graver and the brass plate on vise:
This engraving was done for a DVD box that was a gift for a couple whose wedding photographer I was.
First off me and my dad brainstormed about 3 hours how to make the box. First idea was to make usual rectangular box, but we just couldn’t find a way to put the discs safely there and we definitely didn’t want to use any plastic parts for DVD holders. The problem was also that I had to fit 3 discs there. We tried to come up with a way to modify plastic boxes that hold 4 discs, but nothing was really good… Finally we came up with the simplest solution - circular tower. It was the easiest to build and probably looks most elegant too. Dad went off to build the box out and veneer it, I started to work on engraving design.
Design process usually starts with scanning the detail I want to engrave, in this case 12cm DVD disc, getting the contour lines in Photoshop and printing it out as big as possible, so I’ll have enough room to draw my scrolls and leaves. Then starts the creative process with pencil and lots and lots of eraser. I still rely heavily on the design book, it takes time and practice to learn it…

Drawing the design for this piece took about 4 hours, but I believe it will shorten as my skills improve. Fortunately this detail is symmetrical so I could draw only one side and later mirror-copy that to the other side. After drawing is finished with pencil it is redraw it with black pen, then I erase the pencil lines and the scan the drawing again.

In photoshop I copy the design to the other side, enhance levels and whatnot, mirror the whole design, resize to correct size and print out several copies with laser printer so they can be transferred to the piece. Transferring is done with acetone on damp paper towel - I place the design face down (hence the mirroring in PS) on the metal plate and apply acetone to the backside. This effectively melts the toner on the paper and transfers it to the metal. On this photo the right side is already cut and left side shows toner marks.

After the main lines are engraved it’s ready for shading and background treatment, both are very time consuming. Shading means just adding lots and lots of fine lines to the leaves that will give 3D look. For this project the background was stippled, which means just ‘destroying’ the negative space areas with needle-point tool.
Here’s the stippling tool attached to graver and the brass plate on vise:


")


