Finish thread all finsihes welcome

Ray Cover

~ Elite 1000 Member ~
Joined
Nov 14, 2006
Messages
1,012
Location
Missouri
Hey Bill,

Thanks for the input:)

We have covered French Grey pretty well here. Any of you guys have any other finishing techniques? Ones I would be interested in hearing more about that have been mentioned are

1. Someone earlier mentioned a couple heat treat related finishes. I have heard of these but have never used them and really don't know a lot about how they work.

2. Nitre Blue. Again, I have never done this but I understand it is fairly easy to do if you have a way to maintain the salts at he proper temps.

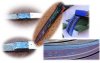
3. Flame coloring. I have done this and find it hard to be consistent with the color. Any tips on that would be appreciated.

4. Anodizing (both titanium/nobium type and aluminum oxide type)

5. A good detailed explanation of rust bluing and browning would be nice.

6. anyone do plating?

If you have a finish you like to use or think is cool tell us about it.

Ray
 

Tim Wells

~ Elite 1000 Member ~
Joined
Nov 9, 2006
Messages
1,331
Location
Dallas, Georgia
I'll bite on two of them.

Flame Coloring of screws: An old watchmakers method is to take a copper plate or sheet material with holes drilled in it to accept the threaded part of screws, they should not be tight. Gently heat the copper plate held in pliers with a torch from underneath. The heat will more gradually and controllably build and turn your screws that bright blue we all love to see; you can do several at a time this way. As soon as you see the color you want, quench it and I mean right now! Just turn the plate over and dump the screws into the water, that's why you want them loose.

These colors change quick from blue to purple and if you're not poised over the quenching pan of water you'll go past the desired color and have to start over. The color change rate when using the plate is a lot more predictable than without because you're directly heating a plate and thereby indirectly heating the screws. It takes practice as in anything but the results are worth it. As the flame licks the plate and the colors change, when you take the flame away the built up heat in the plate that is conducting to the screws continues to heat and change the color for a bit so you have to time it right.

Heat, heat, heat, there's straw, heat some more, there it's starting to get blue and going to bright blue in a second, remove flame and watch. here it comes now, bright blue, QUENCH! Done.

NITRE BLUE: You can get Nitre blueing salts from Brownells. BUT, they only sell it in a bucket, 15# I think it was which is enough for your great grandkids lifetimes for doing screws. Plus they impose a $20.00 haz mat fee for UPS, no getting around it.

The way to heat them up is to get a little melting pot for lead. I got one cheap here.
http://www.midwayusa.com/eproductpage.exe/showproduct?saleitemid=476462&t=11082005

I wish I'd bought the next size up for larger stuff but anyway; you'll need a good thermometer which costs more than the pot but it's a must. Here.

http://www.midwayusa.com/eproductpage.exe/showproduct?saleitemid=357906&t=11082005

Just heat the salts where there is PLENTY of ventilation as they gas off when you first melt them. They'll melt and you can stick that thermometer in there and see the temp range that makes the right color you're after. I think it was around 625 degrees F or so but don't quote me. It would be a good idea to slowly walk up the heat and test some old screws to see what color they turn at a given temp. Let the temp stabilize each time you change that reostat before you put any screws in.

Lastly, and probably the first thing I should have said is for the look you want, the screws need to be polished mirror bright and clean and the blue will knock your eyes out.
 
Last edited:

Ray Cover

~ Elite 1000 Member ~
Joined
Nov 14, 2006
Messages
1,012
Location
Missouri
Thanks Tim,:cool:

What about doing larger items like revolver parts? What could you use for a heating pot?

I have heard some discussion on nitre blue and heat treat/annealing. I don't know if this is correct but this is what makes sense to me.

It is true that heat affect the hardness of carbon steels. Many temper down at around 450 degrees for a half hour on small parts longer on larger parts. SO by time the steel turned blue you are above the temp it takes to temper and are softening the steel.

However, the bluing temp is acting on the surface of the steel and the surface will probably color before the heat has a chance to soak all the way into the steel part (providing the part has any mass to speak of). SO the surface may be softened by the heat but the core of the part may not be affected that much.

Any thoughts on this? Is this an issue on firearms parts like it is on knife parts (especially blades)?

Ray
 

Tim Wells

~ Elite 1000 Member ~
Joined
Nov 9, 2006
Messages
1,331
Location
Dallas, Georgia
Depends on the metal makeup but generally yes, it is softening it some when it's blue. The flame method would do just the surface but on how big a part??? That is something for experimentation or maybe others who have done larger parts will chime in.

All you need is a bigger pot and more salts. It is essentially heat soaking the part once you get the right temp dialed in. That way you can leave it in there and it won't go above that color stage, no need for a super quick quench or having to watch it like a hawk.
 

Bill Brockway

Member
Joined
Nov 10, 2006
Messages
42
Location
Baton Rouge, Louisiana
RUST BLUEING & BROWNING

Blueing and browning by traditional slow-rust methods are, for the most part, the same process, consisting of treating iron or steel parts with a corrosive solution of acids and metallic salts, and rusting them in a controlled humid atmosphere, which produces a coating of brown or red iron oxide (rust) on the surface of the treated piece. If a blue or black finish is desired, the brown iron oxide coating is converted to black iron oxide by boiling the rusted piece in water. I boil mine for 5 minutes at the end of each rusting cycle; any longer is not necessary. You will need a tank large enough to boil a barrel in. Mine is made of galvanized iron flashing, soldered up to make a box about 6 inches square, 36 inches long. I also have made a damp box from wooden shelving material, about 10 inches square, and tall enough to hang a barrel from cup hooks at the top. It has a hinged door on the front, an electric percolator coffee pot (just the bottom, or "pot" part) to produce water vapor, and a bare light bulb, hanging free at about mid-height of the box to raise the air temperature above the dew point, and reduce condensation of water on the parts. With this sweat box, I can reduce the rusting time to a predictable 4 hours per cycle.

The blueing compound I like is Laurel Mountain Forge Barrel Brown and Degreaser (LMF). It is readily available and very forgiving of boo-boos like fingerprints on barrels. For normal blueing or browning, I use it straight out of the bottle. For Damascus barrels, I use it diluted; 1 part LMF to 2 parts water for the 1st coat only; 1 part LMF to 5 parts water for all subsequent coats. The public water supply here is very pure, so I use water straight from the tap. People in other places may need to buy distilled water to avoid getting strange colors with their diluted browner.

The length of time for rusting will depend on the ambient relative humidity in your neighborhood. I live in south Louisiana (hot and humid), and can get decent rusting in 4 hours to overnight. Works faster on rainy days. In recent years, I have been using my homemade "sweat box," described above, to save time.

I card rusted parts in two different ways: with steel wool under water (for Damascus barrels); and with a fine wire wheel from Brownells (about .004," I think), operated dry at a reduced speed. 400 or 500 RPM would be O.K. Most polishing head/grinders operate at much too high a speed for carding, and will rub off too much of the finish.

I normally don't plug the bores when boiling. The only thing the water will do inside the bores is change red rust to black rust, and I always polish the bores after the blueing/browning is completed.

The process is as follows:

1 - Polish the metal; 400 grit is fine enough. Do not buff gun parts on a wheel; it will round off corners that should be square, and wallow out screw holes like craters on the moon.

2 - Coat the parts with an even coating of LMF, and hang them up in a humid environment to rust.

3 - Card the rust off (gently), either with steel wool under water, or with a slow fine wire wheel.

4 - Repeat steps 1 through 3 until the color is satisfactory. Boil after step 2 if you want a black finish.

Hope this helps. Bill
 

Yves Halliburton

Elite Cafe Member
Joined
Nov 9, 2006
Messages
127
Location
Savannah, Georgia
Nickel Plating?

1. Does anyone on this forum do their own Nickel Plating.
2. What process do you use. Electro or Electroless.
3. What equipment do you use.
4. What are the complete steps.
5. Is it worth to do it yourself or not?
 

Bill Brockway

Member
Joined
Nov 10, 2006
Messages
42
Location
Baton Rouge, Louisiana
Oops - I forgot one thing. When coating the parts with LMF, try to wet the parts uniformly, with one sweep of a squeezed-out cotton ball. Don't scrub the cotton ball back and forth, trying to even out the coating. This will cause LMF to precipitate out a coating of metallic copper on the steel, which will inhibit the rusting of the part. Just one sweep with the swab.

Bill
 

katia

Member
Joined
Jun 30, 2007
Messages
79
Location
UK
Well,I just wanted to say that this is on of the most exciting thread I have ever read.
Finishing has always amazed me and I have never had a go at it myself, as the guns I engrave are finished by the gunmakers ... finishers.
But I really would like to try it for myself.
Thanks for all your contributions!
 

firefly

Member
Joined
Mar 7, 2007
Messages
11
On the nitre blue, there are a few things worth noting:

1. The manufacturer recommends that you treat your parts within 20 minutes of finishing, so that oxidation is kept to a minimum and the color stays uniform. I've blued things left longer, but seem to get more uniform color this way.

2. Keep a clean piece of 0000 steel wool (remove the oil by soaking in acetone or denatured alcohol) near your tank. After the initial dunking in the melted salts, check for bubbles on the surface of your part. If you don't remove the bubble by swiping it with the steel wool, it will likely leave a discolored spot under the bubble. The bubbles don't seem to come back after the single swipe with the steel wool.

3. After bluing and quenching, you HAVE to let the part sit up for several hours, preferably with a coating of water-displacing oil (Brownell's sells this) before handling. Never, by the way, use WD-40 or any penetrant like it, as it will get under the bluing and begin to lift it off the steel and leave a splotchy finish. Letting the part sit overnight with a coating of the proper oil will let the finish season and toughen up, so that it won't be prone to rubbing off.

4. Let the salts heat completely before you use them. Wait until any and all bubbles disappear from the salts, as this is moisture boiling off. And above all, DO NOT put a wet part in the hot salts, as it will spit hot salts and steam back at you!


Greg Neely
 

vanknife

Elite Cafe Member
Joined
Feb 16, 2007
Messages
420
Location
Pretoria South Africa
Saltpeter Blueing

Saltpeter bluing

This method is the same as Nitre Blue, This involve HOT WORK. Take Saltpeter and melt on a stove in a aluminum or stainless container. Heat up slow until the saltpeter has melted. Clean work piece with soap and water dry immediately and wipe work piece with degreaser like denatured alcohol or acetone dip work piece in the hot saltpeter, Note that the saltpeter will solidify around the work piece keep work piece in the saltpeter until the saltpeter around the work piece has melted and now is the time to see the color going through the stages as in heat coloring first a light straw and then the blues to the purple etc. When the right color is reached quench the work piece in water to freeze color at that point. Different types of steel has different grade of color at the same temperature.
As a knife maker I have been using this with great success on bolsters and fittings and it seems to me that the higher the carbon content of the steel the darker deep blue one can get. Don’t let any water come close to the HOT saltpeter.

Attached is a picture showing the different colors one can get with this method.

Additional information on Saltpeter.

It is used as a ingredient for making gun powder for black powder guns.

Other names:

Potassium Nitrate / Nitrate of potash

Molecular Formula KNO3


Appearance White Solid / Powder


Melting point 334 Deg. C


[/B] Boiling Point[/B] 400 Deg. C


I am also doing Titanium Anodizing and Nickel platting and have built both units myself. I will give a short Wright up on that within the next couple of days.

Thanks all for sharing.

Cheers

“VAN”
 

Attachments

  • Salpeter blueing_1.jpg
    Salpeter blueing_1.jpg
    66.6 KB · Views: 84
Last edited:

Latest posts

Sponsors

Top