knife bolster

Sam

Chief Administrator & Benevolent Dictator
Staff member
Joined
Nov 6, 2006
Messages
10,491
Location
Covington, Louisiana
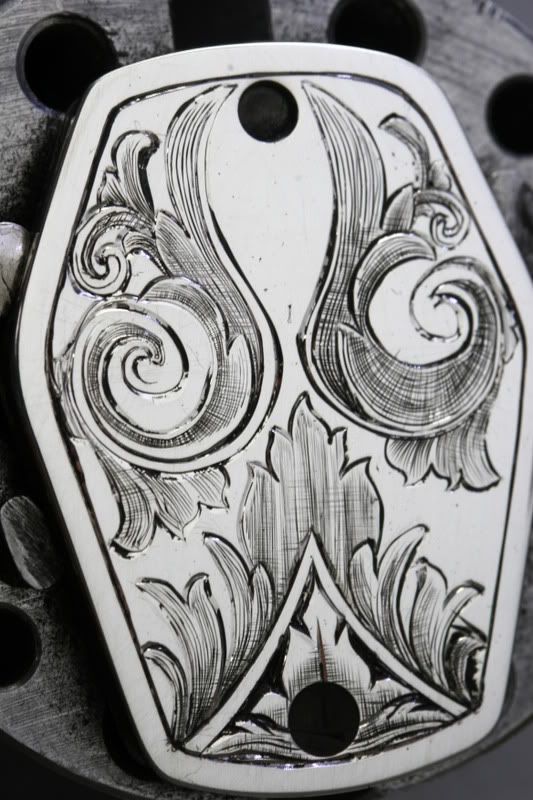
Today's the last day of my engraving class in Sweden, and most of the students are knifemakers. This is a class project we're working on. After I engrave the project I photograph it and give each student a print for study, and thought I'd share it with the forum.

All work done with a 120˚ graver and stippling point for the background.

Cheers / Sam
 

Attachments

  • knife_bolster.jpg
    knife_bolster.jpg
    105.4 KB · Views: 328

vilts

Elite Cafe Member
Joined
Apr 8, 2007
Messages
512
Location
Estonia
That's a good-looking bolster! I wish I could be at that class...
 

Mike Cirelli

~ Elite 1000 Member ~
Joined
Nov 8, 2006
Messages
1,690
Location
Western PA
That looks great Sam. Do you start everyone out with a transfer of the design, and then they kind of follow along with you? How is Sveden the climate is probably a welcome relief after the heat of LA.
 

Sam

Chief Administrator & Benevolent Dictator
Staff member
Joined
Nov 6, 2006
Messages
10,491
Location
Covington, Louisiana
Daniel: Sure, please feel free to use it for practice. Post your results!
Mike: Yes, the class transferred the outline. I finished my plate first, photographed it, and gave them each a copy to refer to as they worked on the shading.
Vilts: Wish you were here too! You'd love these guys...mostly knifemakers and a very enjoyable group. You'd fit right in! / ~Sam
 

cowboy_silversmith

Elite Cafe Member
Joined
Apr 20, 2007
Messages
281
Location
Cedar Ridge, Calif.
Sam~ What a fortunate group of guys to have an unselfish and magnanimous teacher such as yourself Sam.
You are an inspiration and the nature of this forum you've created reflects that fact. Personally I want to "Thank You".

Best regards,
Greg Pauline
 

Bama

Elite Cafe Member
Joined
Dec 6, 2006
Messages
370
Location
Alabama
fantastic

Sam I am constantly in awe of how you can cut your shading lines with a 120. Everything I cut with a 120 looks wide enough to drive a Mac truck down. Can you post a picture of your 120 and give us something to reference it's size. I am thinking I need to grind mine to a much smaller point.

Thanks
 

KCSteve

~ Elite 1000 Member ~
Joined
Jun 19, 2007
Messages
2,882
Location
Kansas City, MO
From what I've seen Sam's got a delicate enough touch to engrave the surface of a water balloon.

After seeing the tip here to check / redo the heels on my 120 I've got much better control over it, but only in the sense that I can get a consistent line without it skipping in and out like a manic porpoise.
 

txtwang

Elite Cafe Member
Joined
Jul 10, 2007
Messages
141
manic porpoise!!!! That's great...and I haven't even progressed to that stage yet!

Jerry
 

KCSteve

~ Elite 1000 Member ~
Joined
Jun 19, 2007
Messages
2,882
Location
Kansas City, MO
manic porpoise!!!! That's great...and I haven't even progressed to that stage yet!

Jerry

You will. Don't know exactly what I did wrong (so it's always possible I'll do it again. :rolleyes: )
There you are, happily cutting with your 120 graver. You set the point on the metal, apply some power and slip down into the metal just a touch. You start along your line and the chip is for some reason getting thicker and thicker. You try to get it to stop diving down somewhere short of the far side of the piece but it's not easy. Finally you get it to at least stay level and continue along. And then the chip starts getting thinner... :confused: Ok, you can at least try going over that part again, but how do you deal with a line that gets so wide?

Ah well, that's why we practice. :) Hopefully I'm not jinxing myself to have problems in my next session. Since I redid my 120 it's been very well behaved.
 

ddushane

~ Elite 1000 Member ~
Joined
Jan 7, 2007
Messages
1,016
Location
Andrews, TX
Awesome design Sam, I wish I was one of those lucky knifemakers! :mad: I probably didn't get my point out right the other day when I commented on the thread "there has to be a point" that Joseph started and wasn't trying to be rude, but This is exactly what I was talking about, you and so many other extremely talented artists on this forum give so much of yourselves for us to learn and I just wanted all of you to know how much I appreciate it. I've been blessed all my life with people who didn't think twice about sharing anything and everything with me weather in woodworking, welding, knifemaking, and now engraving and I do appreciate it more than you guys will ever know! Thanks again for all you do Sam, Dwayne
 

Rick Eaton

Elite Cafe Member
Joined
Nov 9, 2006
Messages
114
Location
Broadview, MT
Sam,
Great design and work, would look great on any knife. Haven't seen you do many knives in the last few years, would nice to see your work on them again. Thanks
Rick
 

Daniel Houwer

Elite Cafe Member
Joined
Mar 21, 2007
Messages
239
Location
Holland
Hy Sam,

Ive started on the bolster design. It is going to be on a silver shell of my loupe so I altered the design a little bit. Further more, since I lack the comforts of a laser printer, I used a polische scribe to draw the pattern on the silver shell. Must say that I wish I could have transferred the image, hand drawing this is a big challenge for me.
I do have a question,
The background is stippled, but did you also lower the metal first by cutting it away with for instance the side of you 120 or a flat graver? Or does stippling straight away lower the material enough for the black paint to cover it?
By engraving this peace I learned a lot about shading so far!
Thank you very much already!
 
Last edited:

Sam

Chief Administrator & Benevolent Dictator
Staff member
Joined
Nov 6, 2006
Messages
10,491
Location
Covington, Louisiana
Daniel: the background on this piece is stippled and not relieved. I darkened it with a Sharpie afterward. I'll be looking forward to seeing what you've done, so consider posting a pic! Cheers / Sam
 

maryw

Member
Joined
Jul 11, 2007
Messages
90
Location
TAYLORS, SC (BETWEEN GREENVILLE & SPARTANBURG
MAN!! SAM!! How beautiful!! Thank you so much for sharing with us! I can't wait to try this as well. The desire I have to engrave and do beautiful work is like a bubble inside my heart - just keeps getting bigger and bigger. I DO love this art!! So thankful that I have had the opportunity to learn the 'how' - now I have to 'do.' Thanks again to all of you who are so willing to share.
mary w
 

Daniel Houwer

Elite Cafe Member
Joined
Mar 21, 2007
Messages
239
Location
Holland
Sam, dont worry, I will post my (arggghh) engravement.
I do have to wait until my co engraver Jimmcutter will have his engraving done.
Still I do think that I will lower the level between the design and the background a bit, so that if when I polish the thing the lower parts will not be touched.

Thanks again.

Daniel.
 

jmcutting

Member
Joined
Jun 7, 2007
Messages
90
Daniel...

Okay so you challenged me to attempt this bolster. First off let me say how reluctant I am to even attempt anything that Sam has engraved. Following a Master sure is humbling. So after 2 1/2 weeks of total engraving here is what I was able to come up with....

Tonight after work I transfered the design, engraved it, removed the background, and blackended it.

Having never removed the background I ran to the hardware store and purchased a dremel tool and ground down a round bur to accomplish the removal... Not really comfortable with this yet but well at least I gave it a try. My background sure doesn't look anywhere near what I was shooting for.

This entire engraving was done by hand no power engraving tools other than the dremel for the background removal. I did the entire plate in about 3 hours including the trip to the hardware store...

I really am not comfortable posting it yet but since Daniel did his Challenge over the weekend I figured I'd post my first attempt. I had originally figured I'd practice the design a bit before I post but here it is.

Please be gentle... Also I haven't gotten a macro lense yet, so the picture isn't as good as it could be.

-justin
 

Attachments

  • DSC03069-Edit.jpg
    DSC03069-Edit.jpg
    104.7 KB · Views: 82

Daniel Houwer

Elite Cafe Member
Joined
Mar 21, 2007
Messages
239
Location
Holland
Hy Justin,

Ofcourse it's humbling to attempt Sam's designs, but as they are used for educational uses lets educate ourselves with Sam's help and ofcourse this forum!
Allso much more fun than engraving just curved exercise lines.

Further more I didn't realize that you used pushgravers only. And for such a short time. Your engraving looks very good to me.
I am very new to the gravemax and microscope and have to say that all the shading was done with my foot of the pedal:eek:
Your three hours engraving is amazing. It took me at least twice that time.
Have no pictures after the stipling yet so this one will have to do.


Can't say enough how much I learned engraving this, and how much I thank Justin.
 

jmcutting

Member
Joined
Jun 7, 2007
Messages
90
Daniel,

Nicely Done!!! I should have taken some pictures during the process but hindsight is always 20/20...

Your Shade Lines are a lot more detailed than what I was able to accomplish and your boarder far cleaner. I had a hard time keeping it consistent and clean. I agree it was very benificial attempting this design and knowing I was going to post it for everyone to see. So thank you for the challenge.

I have not made the jump to power assisted yet by advice of a friend. So I am trying my best to learn as much as I can so that when I go down to visit him next month I will be able to learn a lot from him.

thanks again,

-justin
 

Latest posts

Sponsors

Top