Looking for dis-assembly direction for my old Muehlmatt vise

halfpint23

Member
Joined
Jan 22, 2016
Messages
15
Location
Wettern heck WA
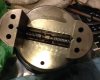
I am a brand new member of this forum, so this post will likely not get seen by many. Hoping to get some guidance in restoration of the old ball vise (block) that I have had for a few years now.

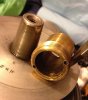
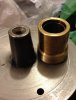
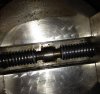
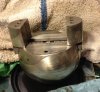
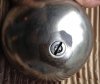
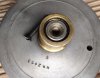
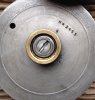
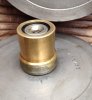
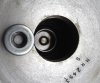
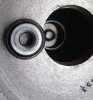
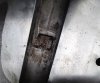
As I took it apart, it became obvious that I am missing a piece of the puzzle, as it were, and perhaps even a piece of the vise! There is a largish brass collar or shaft that remains firmly attached to the upper half of the "ball". This brass part threads into the steel casting of the lower half, and evidently is supposed to ride on the lower ball bearing race.

I strongly suspect there is an upper bearing set INSIDE that brass part. The only rotational movement the vise currently has is on the assembly threads, brass to steel. I cannot for the life of me figure out how to get this thing apart!

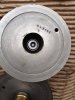
Given the level of crud I have so far cleaned out of the rest of this tool, I figure the upper bearing is either seized or overtightened - but can't get it apart.....

If there is anyone here who is willing to assist with instructions on dismantling this critter I would mightily appreciate some help. LOTS of photos - hopefully this works.
 

Attachments

  • thread shaft installed.jpg
    thread shaft installed.jpg
    96.9 KB · Views: 189
  • thread shaft.jpg
    thread shaft.jpg
    214.9 KB · Views: 187
  • thread shaft closeup.jpg
    thread shaft closeup.jpg
    126.1 KB · Views: 187
  • assembled.jpg
    assembled.jpg
    115.9 KB · Views: 188
  • bottom screws.jpg
    bottom screws.jpg
    88.9 KB · Views: 191
  • brass shaft end02.jpg
    brass shaft end02.jpg
    162.9 KB · Views: 191
  • brass shaft end.jpg
    brass shaft end.jpg
    247.6 KB · Views: 190
  • brass shaft side.jpg
    brass shaft side.jpg
    115.3 KB · Views: 193
  • lower bearing.jpg
    lower bearing.jpg
    90.9 KB · Views: 189
  • lower bearing-closeup.jpg
    lower bearing-closeup.jpg
    171.1 KB · Views: 190
  • lower bearing-installed.jpg
    lower bearing-installed.jpg
    181.5 KB · Views: 193
  • staked fitting on top.jpg
    staked fitting on top.jpg
    173.7 KB · Views: 192

J.Hayes

Member
Joined
Nov 30, 2012
Messages
66
Location
Waterloo WI
I have a similar vise, mine has a taper as part of the top cast half that rides in the brass, the screw on the bottom adjusts the depth at which the taper sits in the brass giving a way to adjust the rotational friction. My vise looks identical but has no branding, just a few numbers, so yours may be different.

20141121_095636.jpg
 
Last edited:

halfpint23

Member
Joined
Jan 22, 2016
Messages
15
Location
Wettern heck WA
Thanks for your reply!
Does your vise just sit together or is there a fastenening mechanism?
If mine does indeed have this steel tapered fixture inside the brass, it is well and truly stuck on there. The steel showing inside the brass is threaded, the machine screw shown in pics only threads in at the very bottom of the hole. ( top of vise when in working position)
The threads for the rest of the bore in that piece of steel are larger, in fact large enough diameter that the screw does not touch those threads until it is nearly bottomed out. This leads me to wonder WHY.
 

Chujybear

~ Elite 1000 Member ~
Joined
Nov 3, 2011
Messages
1,079
Location
Haida Gwaii
Maybe some shellacky lubricant like wd40 was used to grease that brass. That stuff can cure into a super solid substance. I think it would break down if you soaked it in alcohol for a while. Or maybe acetone.
 

halfpint23

Member
Joined
Jan 22, 2016
Messages
15
Location
Wettern heck WA
It's been soaking in penetrating oil three days now - finally beginning to see a touch of seepage through joints between disparate metals.
Background, when I got this a couple years ago, it was CRUDDY... looked as though it had been dedicated to holding items just for polishing work, as it was layered in rouge and greasy/rusty crud. The guy I got it from had bought an estate from a jeweler/watch repair shop; this was one of three blocks he sold in a short time. Unfortunately he mixed up the fixture assortments, and the ones for mine went to someone else. SO, if I can get it rotating again, I get to make fixtures for it next....
 

J.Hayes

Member
Joined
Nov 30, 2012
Messages
66
Location
Waterloo WI
Mine is just held by gravity.

Thread the top half back in, you may be able to "press" the top out of the brass by using the center screw on the bottom, it presses the bearing up against the center of the top "stem". The outer screw locks the threaded brass cone from rotation and helps set the slop in the halves. Those tapers lock, just like a Morse Taper, you may be able to free by removing that center screw and gently using a brass punch through the bottom.

Gun leather, nice, me too.

Jeremy
 
Last edited:

halfpint23

Member
Joined
Jan 22, 2016
Messages
15
Location
Wettern heck WA
Monday update, PB Blaster is pretty good!
Lower end parts are now all free. The inner screw that adjusts height of the bearing center runs all the way in and out ( though staking still stops it removal from threaded insert) .
That threaded insert , whose slot is shown in the fifth photo in the series (and that I was seriously looking at getting a drag link socket to turn, as it was seized TIGHT) turned IN this morning with a gentle twist using my old tack puller as a spanner.
That fitting is actually the cup that contains the bearing. To remove it it must be turned inward and dropped into the cavity of the casting of lower ball half.
Now, about that infernal brass collar...

Jeremy, I am too darn chicken to go to whacking away at threaded fittings (blind) even if I had a brass drift small enough to go through the hole as you describe.
See photo six - that threaded hole in the spindle??? the screw that fills it in the seventh photo does NOT ride on the visible threads, it only threads into the bottom of the hole by four turns. It passes freely and without touching past the visible threads.

I have NO idea what is supposed to be threaded in there, as the screw seems to have no reason other than keeping bugs out of the threaded cavity! Darn it I wish I could find an image - patent drawings have only ONE, and they are not the cutaway views.
http://www.datamp.org/patents/displayPatent.php?id=30934
 

J.Hayes

Member
Joined
Nov 30, 2012
Messages
66
Location
Waterloo WI
That screw holds the yoke(your last picture ) that keeps the vise screw centered. Take the jaws off and it should drop out once the screw is removed.

Yes, tapping on stuff is a calculated risk. If it is a taper like mine, it will probably require a tap to free it, think Morse Taper in a drill spindle or lathe tailstock.
 
Last edited:

halfpint23

Member
Joined
Jan 22, 2016
Messages
15
Location
Wettern heck WA
Thanks Jeremy,
That yoke is MIA on mine, though I see staked corners where I "think" it must have been. Makes sense the four-thread screw wound hold that in place. The larger diameter threads are a mystery.
I think I'll let the penetrant have a bit more time to work before I go all medieval on it with hammer and drift. Possibly a touch of the hot wrench on brass is warranted here. Got some pretty petrified thing apart with heat and a ten-ton Porto-Power
 

halfpint23

Member
Joined
Jan 22, 2016
Messages
15
Location
Wettern heck WA
LOL! well, that was a rusted 1-inch pin frozen into the ball joint in lift arm on a three-point hitch on a John Deere tractor..... It was a PROJECT.... but I got it done :clapping:
Never underestimate the power of an exasperated woman who understands use of power tools :mad: :shock: :beatup: :cool:
 

halfpint23

Member
Joined
Jan 22, 2016
Messages
15
Location
Wettern heck WA
Success!!!
Dried off solvents and applied fire to only the brass. Got it "pretty warm" just before color change. Gave it a few sharp whacks with big screwdriver handle and it popped right off
 

halfpint23

Member
Joined
Jan 22, 2016
Messages
15
Location
Wettern heck WA
Yes, very similar to your Jeremy. And yes, knowledge IS power :)
I was a bit surprised at the obvious abuse the spanner holes had when the brass thing came off - they were tight against the upper ball half, so could not see them until I got it apart.
SOMEBODY has really messed up some screws and etc on this old machine.
SOMEBODY needs a bit of remedial education in proper use of tools from a crabby old lady mechanic :)
With any luck at all I will never meet this person.

Onward and upward!
 
Last edited:
Top