More silver/gold flare cut experiments

rod

~ Elite 1000 Member ~
Joined
Nov 19, 2006
Messages
1,609
Location
Mendocino. ca., and Scotland
Here are a few photos ( sorry for low res, just have my iPhone right now).

I apologize, I appear to have my photos embarrassingly large, and showing more defects than I had hoped!

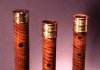
This is the silver end cap of a wood flute that I am making. It has many silver rings. The owner wants only the end cap and key engraved. The end cap has a low dome profile.

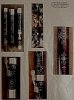
The potential contrast is promising.

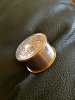
I show a practice piece first on this 30 mm diameter cap ( about 1.2 inches dia).

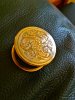
In order to teach myself more high risk design form, as well as cutting skills, I layout only a backbone, and then go at it improvising from there. This way, I find myself thinking seriously about design balance, as you cannot take the cut away. Many will see the layout full of faults, and I deeply appreciate any hints and tips to do better.

I photographed the piece while I am still in the process of sanding off the under plate of nickel, used as a firewall to stop gold atoms diffusing into the silver. Was very surprised at how tenacious the nickel is, on the round cylindrical portion, I have sanded gold and nickel off to leave only gold on the raised ornamental 'relieves' at each end, for contrast.

Apart from imperfect cutting, you will see that you have to be careful to go deep enough with your engraving to get it well below sea level, otherwise sometimes, the fine sanding of the surface, using 2000 paper and oil, will start to sand off part of your cuts. You will see areas where that is happening, so I will re-cut these deeper, and re-plate.

Rod
 

Attachments

  • ccopy bress cap backbone.jpg
    ccopy bress cap backbone.jpg
    116 KB · Views: 302
  • trial bressan top.jpg
    trial bressan top.jpg
    169.6 KB · Views: 300
  • IMG_0392.jpg
    IMG_0392.jpg
    110.5 KB · Views: 293
  • IMG_0391.jpg
    IMG_0391.jpg
    123.6 KB · Views: 295
  • IMG_0390.jpg
    IMG_0390.jpg
    115.4 KB · Views: 295

rod

~ Elite 1000 Member ~
Joined
Nov 19, 2006
Messages
1,609
Location
Mendocino. ca., and Scotland
Mark,

I will let you see the finished flute, it is acid stained boxwood, but not flamed.

I want a touch of gold to harmonize with the acid stained boxwood flute... a kind of dark chestnut. Here is one I made some years ago with flamed boxwood, and in this case solid gold rings (those were the days!).

The original is in the V and A Museum London and is ebony with inlay-ed silver everywhere. I made one in this original style, and it is played by the Prof of Flute in Amsterdam Conservatory ... way too much work. I have posted the ebony one before, but here it is again for comparison:

Rod
 

Attachments

  • bressan box and gold.jpg
    bressan box and gold.jpg
    94.3 KB · Views: 251
  • P1016025.jpg
    P1016025.jpg
    135.3 KB · Views: 256
Last edited:

Marrinan

~ Elite 1000 Member ~
Joined
Nov 11, 2006
Messages
2,917
Location
outside Albany in SW GA
Rod, Your inverted engraving is just terrific. You have so much dedication to your art it is inspiring to any who will listen and see. Thank you for being with us here in the Café'. I am very glad you take the time. Fred
 

Roger Bleile

~ Elite 1000 Member ~
Joined
Oct 4, 2007
Messages
2,991
Location
Northern Kentucky
Rod,

Your end cap has the kind of baroque style that goes perfectly with your baroque flutes. Your client must be amazed at the breadth of your craftsmanship.

Looking at the flutes with the silver wire inlayed into the wood reminded me of something that Paul Hamler showed me whereby he had used silver dental amalgam to fill the engraved channels in the wood and it was indistinguishable from inlayed wire, though far less labor intensive.

Cheers,
Roger
 

rod

~ Elite 1000 Member ~
Joined
Nov 19, 2006
Messages
1,609
Location
Mendocino. ca., and Scotland
Thank you friends!

Roger, Paul and I are sort of kindred spirits, and having been talking tools and fixtures for a number of years. You and I know he is a great man, and his blog/web is a garden of delights for the likes of us:

http://hamlertools.blogspot.com/

He had independently come up with some nice ways of grooving into some hardwoods of the gun stock variety, and shared these with me, when we both discovered we had dipped into 'metal inlay into wood'. I had taken a totally different approach years ago that eventually resulted in the ebony flute you see here. It depends on very, very small width ditches cut in tight curves, which must be at least five times deeper than their width. I filled the ditches in either of two ways, with fine silver wire rolled flat and inserted edgewise, or as an alternative, with high content silver amalgam...rarely used in practice but reserved for dental students exams. I sent these to Paul to examine, as I was so pleased to find some one who 'got it', and had also his own independent alternatives. I would love to get East and see his workshop for real. You will know his experience extends to numerical and computer skills, as well as his many inventions and miniature rifles. What a man!

Turning to the silver inlay above, the usual gun stock metal inlay techniques uses stabbing chisels .... what a fabulous example we saw in the award winning gun at Reno! In my case I had to find a way to cut the grooves in hardwood to form very tight spirals. Everything failed until I tried the high speed a dental hand piece. This allowed me to 'burn' the ditches with friction, due to high speed, and using plain tiny round dowels as the toothless cutters.

Better not describe Paul's technique in public, I will leave that to him, but it is very nice, and fascinated me.

Rod
 

Arnaud Van Tilburgh

~ Elite 1000 Member ~
Joined
Oct 3, 2008
Messages
4,221
Location
Belgium
Real nice Rod, may I ask what graver you use to do the biggest part of the leaves, seems you use something like a round graver for that

arnaud
 

bronc

Elite Cafe Member
Joined
Nov 12, 2006
Messages
919
Location
Portales, NM
Rod, that is one of the finest examples of flair cutting I have seen. Great design and great execution. Well done!!!!!

Stewart
 

rod

~ Elite 1000 Member ~
Joined
Nov 19, 2006
Messages
1,609
Location
Mendocino. ca., and Scotland
Thank you all for your encouragement,

I now know where I need improvement. Flare cutting is like Western Bright cutting in this respect, it is semi carving with the idea of revealing bright facets that catch the light for more sparkle from varying angles of viewing, something that cannot show on a picture as it overexposes, but in reality it is effective. As I have written earlier, if you are going to try the gold/silver contrast, make sure your cuts are all nicely below the surface so no line is touched as you fine sand the negative space of the surface to bring the silver back to life. I scallop the side edges of my standard flat graver, having a gentle rounded heel in order that side edge drag does not mar the bright cut when navigating very small and tight turns. Western Bright in general does not need such tiny turns and the bright flat is lifted rather abruptly out of the metal, and not gently scooped out, so a standard rounded heel flat works very well, as shown by many excellent bright cutters posting regularly on the forums.

Our colleague, Ray Cover, posted an excellent hint to show that starting from a square graver blank, and grinding the flat on the corner, you could quickly reach the geometry I was suggesting. I pounced on his good suggestion and tried it out, but still his design, for me, continues to give edge drag unless I tweak it a bit more in my original geometry. It is however a better way to cut down grinding and I appreciate this, Ray. It may well be that Ray and others who have superior skills will lift the flat on a tight turn to produce a clean result with no drag, and maybe all I have to do is practice a high lift finish? Unlike Western Bright, in flare cutting the tool hand is actually lowered as you exit the metal so you can end up with some interesting exit shapes, and this lowering of the tool angle is what encourages edge contact. In the picture below, the movement is sort of like an aircraft taking off from the run way, if that big jet plane was not made with the tail end of the fuselage highly sloping upwards, as the aircraft lifts its nose up at takeoff, the back end goes down, and the relief of the belly just barely avoids the back end scraping the runway. As an analogy, if the aircraft actually made a tight turn as it took off that would be what the exit of a flare cut graver would be doing.

By contrast, a bright stroke in western style pops the chip off at the end of the cut almost like popping the cap of a bottle of beer... maybe that is over exaggerated, but the technique produces good results, and no need to lower the back of the tool.

Arnaud, yes, I am doing exactly what you assume to scoop the wide leaves, I use a round. I have many experiments of round, small and wide and I like ones which have a very exaggerated long polished heel that will burnish bright. I select the narrowest one to do a full scoop, as you do not want to stray wide into other areas. For some reason my bright was not behaving in the photos above, they are usually better. With these almost spherical heels, I load a polishing buff with fine diamond paste and give plenty of buffing to the large curved underside after it is ground and lapped. This destroys the front cutting edge, but gives a mirror underside. That done, I easily restore the front face by lapping at 40 degrees in the usual way to end up with a crisp edge. Hogging a deep scallop in one bite sometimes gives a rippled surface, but the second time over it with a lighter chip gives the mirror surface.

Rod
 

Attachments

  • airbus-a380-takeoff.jpg
    airbus-a380-takeoff.jpg
    25.6 KB · Views: 56
Last edited:

mvangle

Elite Cafe Member
Joined
Jan 8, 2010
Messages
305
Location
Pilot Virginia.
I like it. I like it alot.
Your work, like many others on the forum and in FEGA is so diverse and interesting!
Maybe a better term would be mesmerizing!
 

Sam

Chief Administrator & Benevolent Dictator
Staff member
Joined
Nov 6, 2006
Messages
10,491
Location
Covington, Louisiana
Beautiful work, Rod. You are becoming quite the flare guy! This is outstanding and you just keep getting better at it. And I really appreciate your detailed explanation. I need to spend more time honing my skills at flare cut.
 

GTJC460

~ Elite 1000 Member ~
Joined
Mar 24, 2010
Messages
1,327
Location
Tullahoma TN
Wow. What a great example of flare cut! Your explanations are fantastic. Thanks for taking the time to document and explain your methods.
 
Top