Aspiring hobbyist here.
I wanted to dip my toe in the water to see if this is something I'm interested in pursuing.
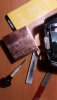
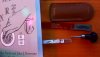
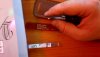
I purchased a couple of GRS blanks, some stones I saw recommended online and a basic rosewood handle of Amazon.
I think I may have ordered the wrong size handle, blank or both. I'm just trying to put together a simple hand push engraver to try to follow along to the copy of "The Jewelry Engravers Manual" that I picked up.
Could someone please point me in the right direction to get started?
I wanted to dip my toe in the water to see if this is something I'm interested in pursuing.
I purchased a couple of GRS blanks, some stones I saw recommended online and a basic rosewood handle of Amazon.
I think I may have ordered the wrong size handle, blank or both. I'm just trying to put together a simple hand push engraver to try to follow along to the copy of "The Jewelry Engravers Manual" that I picked up.
Could someone please point me in the right direction to get started?
Attachments
-
 DSC_1317.JPG76.3 KB · Views: 142
 -
 DSC_1318.JPG61.9 KB · Views: 141