ibex
Member
You did it well
keep going
keep going
Yes the background is usually removed before stippling. I shoot for about .010. You can go more just adds to the look but makes for a much longer process. For the most part 10 thou (about 2.5 sheets of printer paper thick) can be achieved in one pass with most pneumatic hand pieces.Had a go at stippling, do you have to remove the background before stippling? Any advice would be most appreciated thank you
That’s great advice much appreciated I’m going to have another go with it and take on board your helpful advice.Yes the background is usually removed before stippling. I shoot for about .010. You can go more just adds to the look but makes for a much longer process. For the most part 10 thou (about 2.5 sheets of printer paper thick) can be achieved in one pass with most pneumatic hand pieces.
This creates a better depth effect also protects the stippling from being damaged. Also stippling usually is darkened with ink or paint to increase the level on contrast making your subject areas pop more.
I like to go in a circular pattern while stippling. Helps to make it so you don’t miss areas and actually end up going over areas more than once. Makes for a nice flat tone. Try to avoid to tip digging into the piece and instead have the hand piece closer to 90 degrees and looser in your grip so you’re not bearing down. I hold my Lindsay classic like it’s a pencil with the hose following down my wrist and arm. Let the tool do the work
also the flatter you have the cavity cut beforehand the better the outcome of the stipple job. Hope this helps
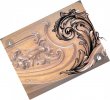
Thank you AlanThe difference in the plate shown on Feb 23 and today is amazing. Got a ways to go but the progress you are showing is an indication of increased understanding of the flow of the design and shading. One of the common mistakes that some beginner engravers make ( I was guilty of this 45 years ago ) is going too fast to see what its going to look like at the end. I kind of think that may be the case here.
The opening scroll is not right. You have missed a cut where the start of the C scroll passes over the leaf. You have combined the two into a whole. Then you have shading that looks like tire tracks following neither the leaf or the C scroll. They are just hanging around looking for direction. About two thirds of the way up you have a scroll going in a straight line. There are other places where the lines were not cut as well as they should have been.
I think what you should consider is to slow the process way down. You have a transfer to work from. When the transfer is applied to the plate take a pencil and use it to follow the scroll from the beginning to the end and just the scroll backbones and not the shading. Get some idea of how the scroll is growing. Its like studying the anatomy of the plant your transfer put on the plate.
Just cut the scroll backbone lines with out caring about the shading. If your mind is on the shading your backbone cuts will be off the mark. Its a very simple idea but a hard one to learn. You will do best at the beginning to go as slow as possible.
When you have the scroll backbone finished wipe off the transfer and take a photo of the engraving. I do this all the time and for some reason it gives me a better idea of how it looks that actually looking at it with my eyeballs.
After that do another transfer, lay it over the backbone engraving, matching the previous transfer cuts and burnish it in. Before starting to cut the shading see if the transfer is off in some spots. This will tell you how accurately you cut the backbones. The start the shading. One line at a time. One line at a time. Focus on one line at a time. Don't worry about the next line until you finish the line you are working on.
You're off to a great start in a short amount of time, keep with it.
Allan
")

 pin.it
 pin.it

 pin.it

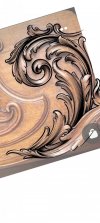


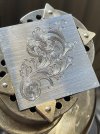
Good morning Gunsmith, Your work is coming along nicely. your borders look good and are pretty consistent. Might I suggest you examine and visualize how your knobs ending, examine other scrolls to see what i mean.View attachment 52496 Feel slightly more happy with my progress need loads more practice with shading
Hi BBGood morning Gunsmith, Your work is coming along nicely. your borders look good and are pretty consistent. Might I suggest you examine and visualize how your knobs ending, examine other scrolls to see what i mean.
You currently just have one solid line placed in the middle of all four knobs present in the design, these single lines don’t serve any other purpose than being there, they should give the indication of a turn or a fold. Just something to study for the next one. Hope you have a wonder weekend. BB