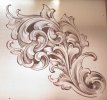
practice

Gunsmith

Member
Joined
Nov 29, 2022
Messages
64
Had a go at stippling, do you have to remove the background before stippling? Any advice would be most appreciated thank you
 

Attachments

  • 1F36BF5E-CB7F-4815-9079-B6A6E71A492C.jpeg
    1F36BF5E-CB7F-4815-9079-B6A6E71A492C.jpeg
    180.2 KB · Views: 129

Mike576

Elite Cafe Member
Joined
Nov 20, 2020
Messages
263
Location
Ledyard Connecticut
Had a go at stippling, do you have to remove the background before stippling? Any advice would be most appreciated thank you
Yes the background is usually removed before stippling. I shoot for about .010. You can go more just adds to the look but makes for a much longer process. For the most part 10 thou (about 2.5 sheets of printer paper thick) can be achieved in one pass with most pneumatic hand pieces.

This creates a better depth effect also protects the stippling from being damaged. Also stippling usually is darkened with ink or paint to increase the level on contrast making your subject areas pop more.

I like to go in a circular pattern while stippling. Helps to make it so you don’t miss areas and actually end up going over areas more than once. Makes for a nice flat tone. Try to avoid to tip digging into the piece and instead have the hand piece closer to 90 degrees and looser in your grip so you’re not bearing down. I hold my Lindsay classic like it’s a pencil with the hose following down my wrist and arm. Let the tool do the work

also the flatter you have the cavity cut beforehand the better the outcome of the stipple job. Hope this helps
 

Gunsmith

Member
Joined
Nov 29, 2022
Messages
64
Yes the background is usually removed before stippling. I shoot for about .010. You can go more just adds to the look but makes for a much longer process. For the most part 10 thou (about 2.5 sheets of printer paper thick) can be achieved in one pass with most pneumatic hand pieces.

This creates a better depth effect also protects the stippling from being damaged. Also stippling usually is darkened with ink or paint to increase the level on contrast making your subject areas pop more.

I like to go in a circular pattern while stippling. Helps to make it so you don’t miss areas and actually end up going over areas more than once. Makes for a nice flat tone. Try to avoid to tip digging into the piece and instead have the hand piece closer to 90 degrees and looser in your grip so you’re not bearing down. I hold my Lindsay classic like it’s a pencil with the hose following down my wrist and arm. Let the tool do the work

also the flatter you have the cavity cut beforehand the better the outcome of the stipple job. Hope this helps
That’s great advice much appreciated I’m going to have another go with it and take on board your helpful advice.
Regards Andrew
 

allan621

:::Pledge Member:::
::::Pledge Member::::
Joined
Jan 10, 2007
Messages
375
The difference in the plate shown on Feb 23 and today is amazing. Got a ways to go but the progress you are showing is an indication of increased understanding of the flow of the design and shading. One of the common mistakes that some beginner engravers make ( I was guilty of this 45 years ago ) is going too fast to see what its going to look like at the end. I kind of think that may be the case here.

The opening scroll is not right. You have missed a cut where the start of the C scroll passes over the leaf. You have combined the two into a whole. Then you have shading that looks like tire tracks following neither the leaf or the C scroll. They are just hanging around looking for direction. About two thirds of the way up you have a scroll going in a straight line. There are other places where the lines were not cut as well as they should have been.

I think what you should consider is to slow the process way down. You have a transfer to work from. When the transfer is applied to the plate take a pencil and use it to follow the scroll from the beginning to the end and just the scroll backbones and not the shading. Get some idea of how the scroll is growing. Its like studying the anatomy of the plant your transfer put on the plate.

Just cut the scroll backbone lines with out caring about the shading. If your mind is on the shading your backbone cuts will be off the mark. Its a very simple idea but a hard one to learn. You will do best at the beginning to go as slow as possible.

When you have the scroll backbone finished wipe off the transfer and take a photo of the engraving. I do this all the time and for some reason it gives me a better idea of how it looks that actually looking at it with my eyeballs.

After that do another transfer, lay it over the backbone engraving, matching the previous transfer cuts and burnish it in. Before starting to cut the shading see if the transfer is off in some spots. This will tell you how accurately you cut the backbones. The start the shading. One line at a time. One line at a time. Focus on one line at a time. Don't worry about the next line until you finish the line you are working on.

You're off to a great start in a short amount of time, keep with it.

Allan
 

Gunsmith

Member
Joined
Nov 29, 2022
Messages
64
The difference in the plate shown on Feb 23 and today is amazing. Got a ways to go but the progress you are showing is an indication of increased understanding of the flow of the design and shading. One of the common mistakes that some beginner engravers make ( I was guilty of this 45 years ago ) is going too fast to see what its going to look like at the end. I kind of think that may be the case here.

The opening scroll is not right. You have missed a cut where the start of the C scroll passes over the leaf. You have combined the two into a whole. Then you have shading that looks like tire tracks following neither the leaf or the C scroll. They are just hanging around looking for direction. About two thirds of the way up you have a scroll going in a straight line. There are other places where the lines were not cut as well as they should have been.

I think what you should consider is to slow the process way down. You have a transfer to work from. When the transfer is applied to the plate take a pencil and use it to follow the scroll from the beginning to the end and just the scroll backbones and not the shading. Get some idea of how the scroll is growing. Its like studying the anatomy of the plant your transfer put on the plate.

Just cut the scroll backbone lines with out caring about the shading. If your mind is on the shading your backbone cuts will be off the mark. Its a very simple idea but a hard one to learn. You will do best at the beginning to go as slow as possible.

When you have the scroll backbone finished wipe off the transfer and take a photo of the engraving. I do this all the time and for some reason it gives me a better idea of how it looks that actually looking at it with my eyeballs.

After that do another transfer, lay it over the backbone engraving, matching the previous transfer cuts and burnish it in. Before starting to cut the shading see if the transfer is off in some spots. This will tell you how accurately you cut the backbones. The start the shading. One line at a time. One line at a time. Focus on one line at a time. Don't worry about the next line until you finish the line you are working on.

You're off to a great start in a short amount of time, keep with it.

Allan
Thank you Alan
For your great advice I think your right I feel like I am rushing to see the end result and did notice I got lost with some of the elements need to slow it down ,will have another go and start again , I must say this group is excellent and the advice I’m getting is great , it’s a shame I live in the uk engraving classes are hard to find thanks again for your advice all the best .
Andrew
 

allan621

:::Pledge Member:::
::::Pledge Member::::
Joined
Jan 10, 2007
Messages
375
Learning a craft that requires practice to improve is like learning a musical instrument. And if you've heard a young kid with a musical instrument practice in the beginning, that's where you're at with engraving. I'm sure there are some engravers who picked up a graver and started quick. Believe me, I wasn't one and I assume you aren't either. I don't know Sam Alfano but even he had to start somewhere and even though he may have progressed rapidly, there had to be yards of practice and experimentation to achieve what he has.

Just stay with it, don't get discouraged, date your practice plates and keep them to see your progress. Its like one step forward and a half step back at times but if you keep at it you'll be the envy of your non-engraving friends and quite a few beginners as well.

Allan
 

allan621

:::Pledge Member:::
::::Pledge Member::::
Joined
Jan 10, 2007
Messages
375
Its a lot better than your previous scrolls. The shade lines actually follow the leaves, the scroll cutting is much smoother with only one major flat spot. Pretty good. I think what happens when you start engraving you have to learn to see what you're looking at. And the beginning is starting to look good. And don't cut deep yet until you have a reason to. Keep doing what you're doing and keep at it.

Allan
 

Dani Girl

:::Pledge Member:::
::::Pledge Member::::
Joined
May 6, 2012
Messages
1,228
Location
NSW, Australia.
I was just thinking it might help to have a look at what sort of things one might be trying to imitate in 2d with some woof carving pictures.

Having trouble trying to find the right photos :)

This scrollwork would translate well to engraving and reminds me of Sam Welches latest knife engraving.
 

Attachments

  • SmartSelect_20230408_114737_Chrome.jpg
    SmartSelect_20230408_114737_Chrome.jpg
    20 KB · Views: 41

Dani Girl

:::Pledge Member:::
::::Pledge Member::::
Joined
May 6, 2012
Messages
1,228
Location
NSW, Australia.
Just having a go on my phone on my Concepts app at figuring out how I'd engrave this carving design, might be of interest. Hope I'm not high jacking your thread. Just wanted to share what I've been doing to figure out shading more. I thought I knew what I was doing then tried wood carving and had no idea what was raised and lowered or what curved convex or concave... a big learning curve.
 

Attachments

  • scroll lines and study piece.jpg
    scroll lines and study piece.jpg
    154.7 KB · Views: 54
  • study carving.jpg
    study carving.jpg
    86 KB · Views: 47
  • scroll lines and study piece infinite.jpg
    scroll lines and study piece infinite.jpg
    100.6 KB · Views: 48
  • scroll lines carving study .jpg
    scroll lines carving study .jpg
    77.9 KB · Views: 55

mtlctr

Elite Cafe Member
Joined
Jan 6, 2015
Messages
381
Location
NW Ohio
I see a lot of nice work Here ( practice plates). I’m not qualified to judge or critique.
no disrespect meant , but in art , there are no rules. I say this as a multi media artist. Watercolor,graphite, charcoal, metalwork, gun stocker, hobbyist engraverThere may be acceptable parameters but beauty is in the eye of the beholder. Sam & others here & elsewhere are masters in their work I’m guessing they see different ways / techniques frequently,that’s what art form is about.
again I’m no expert except military rifle course don’t want to ruffle any feathers just my viewpoint. IMG_0746.jpeg
 

Dani Girl

:::Pledge Member:::
::::Pledge Member::::
Joined
May 6, 2012
Messages
1,228
Location
NSW, Australia.
Does anyone want to try to talk me through how to show folk how to draw on concepts... it's pretty easy but there's a few things handy to know.

Danae.
 

Attachments

  • doodles on concepts.jpg
    doodles on concepts.jpg
    62.5 KB · Views: 28

Rannis

Member
Joined
Dec 31, 2022
Messages
62
While on the topic…
 

Attachments

  • IMG_1620.jpeg
    IMG_1620.jpeg
    300.3 KB · Views: 33

T.G.III

:::Pledge Member:::
::::Pledge Member::::
Joined
Jul 25, 2009
Messages
356
Location
Oregon
As was mentioned earlier, there are no absolutes in the art world, nothing is sacred as the beauty is always in the eye of the beholder.

Contrary to popular wisdom, practice does not make perfect, practice just makes better, I am sure that if you ask any of those at the top end of this art form, nearly all of them will tell you that there is room for improvement in their works.

KIMG2393~2.JPG
 

ByrnBucks

:::Pledge Member:::
::::Pledge Member::::
Joined
Dec 25, 2020
Messages
213
Location
Chattanooga, TN
View attachment 52496 Feel slightly more happy with my progress need loads more practice with shading
Good morning Gunsmith, Your work is coming along nicely. your borders look good and are pretty consistent. Might I suggest you examine and visualize how your knobs ending, examine other scrolls to see what i mean.
You currently just have one solid line placed in the middle of all four knobs present in the design, these single lines don’t serve any other purpose than being there, they should give the indication of a turn or a fold. Just something to study for the next one. Hope you have a wonder weekend. BB
 

Gunsmith

Member
Joined
Nov 29, 2022
Messages
64
Good morning Gunsmith, Your work is coming along nicely. your borders look good and are pretty consistent. Might I suggest you examine and visualize how your knobs ending, examine other scrolls to see what i mean.
You currently just have one solid line placed in the middle of all four knobs present in the design, these single lines don’t serve any other purpose than being there, they should give the indication of a turn or a fold. Just something to study for the next one. Hope you have a wonder weekend. BB
Hi BB
Thanks for your kind words and good advice I see what you mean will look into that.
Regards Andrew
 

Latest posts

Sponsors

Top