
KatherinePlumer
Elite Cafe Member
I just finished a project that's something a little different for me, a belt buckle! Since this piece is likely to be worn on special occasions by the recipient, I set out to scrim is a little less delicately than some of my other pieces.
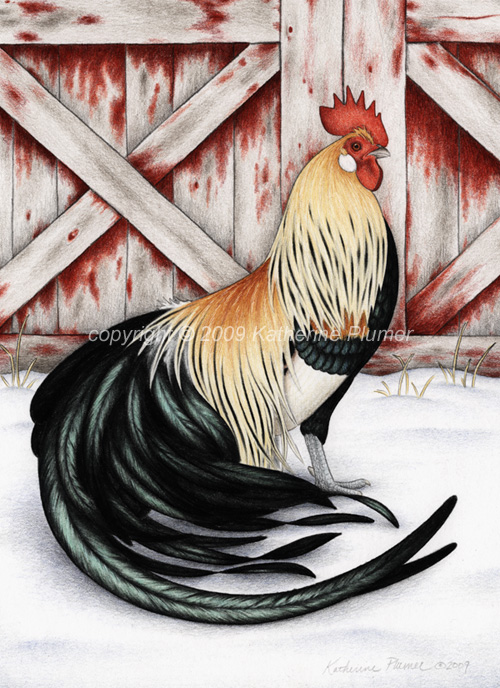
This project has been a long time in the making, but from the start there was no doubt as to what the subject matter should be. This piece was commissioned as a gift (from a group of people) to honor a professor of Avian Science who has done so much work for exhibition poultry, 4-H, and youth exhibitors over the years.... and who happens to have a particular fondness for belt buckles.") I knew that the Phoenix fowl has a special place in her heart, and thought that breed of chicken would make a great subject for the buckle. But how to do that.... How to fit a very "long" bird into that space. For a little history, this this is a breed I have depicted often in my art, in different poses and different formats. The American version of this bird can have a tail up to about 6 feet in length, but the ones you'd see at shows are usually much shorter than that.
I knew that the Phoenix fowl has a special place in her heart, and thought that breed of chicken would make a great subject for the buckle. But how to do that.... How to fit a very "long" bird into that space. For a little history, this this is a breed I have depicted often in my art, in different poses and different formats. The American version of this bird can have a tail up to about 6 feet in length, but the ones you'd see at shows are usually much shorter than that.
Often they are depicted with the tail streaming out behind in a long horizontal piece, or perched with the tail hanging down in a long vertical art piece:

This next one (deliberately not meant to match "Standard" descriptions, but positioned to fit a very specific shape of rectangle) obviously has a significantly shorter tail, that sweeps around beside him in this drawing:
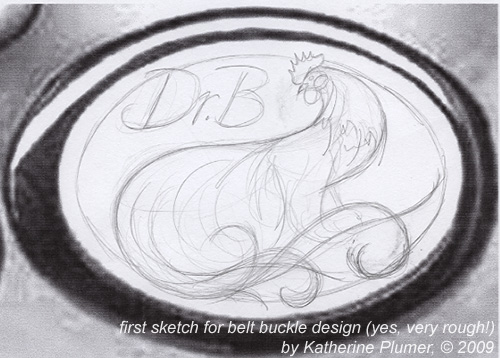
I was thinking the bird for the belt buckle would be similar to this guy, but more horizontal in stance, with a longer more sweeping tail, and looking back over his shoulder to balance out the composition a little bit. Please don't laugh at this very rough sketch, everything starts out like this, and it's just a little thumbnail sketch:
So I started drawing that on a full sheet of paper, but just wasn't having any luck with it, I couldn't get it to look right with him turning his head that way. I got really frustrated, and then realized all I needed to do was turn the bird around so that he's looking over the other shoulder, like so:
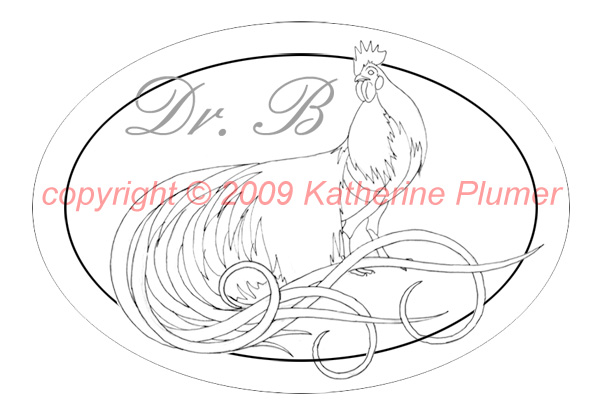
Much better! That is the final mockup sketch. There were many in between which I'm not going to show you, but it was quite a long progression. As this is a belt buckle, which people tend to think of as being engraved metal, I wanted to incorporate some scrollwork, but I couldn't really follow the scrollwork "rules,", because it was more important that the bird have tail feathers that could be somewhat realistic, instead of just swirling off into totally fanciful scrollwork. So there was a pretty fine line of what I could do, and I went back and forth on how many feathers should be curled, how to intersect and overlap them, and eventually this is just what felt right, so I went with it. I was thrilled to find that font, because I could loop one of the letters around the border the same way that I did with the tail feathers.
So once I got that all finalized, it was time to start on the scrimshaw itself. I'm not going to talk about technique. I've done some tutorials, I've talked about it a lot, and certain things get to be my little secrets. As a review though, remember that scrimshaw is the art of engraving on ivory/bone/synthetic. The engraved markings are then filled with ink, to create the image. Multicolor images are built up one layer at a time (JUST LIKE DRAWING!). Sometimes I work dark to light, sometimes light to dark, sometimes I skip around. It has more to do with where various colors are located in a piece I guess, so that I don't end up smearing things into places they shouldn't go. Here's how this one progressed:
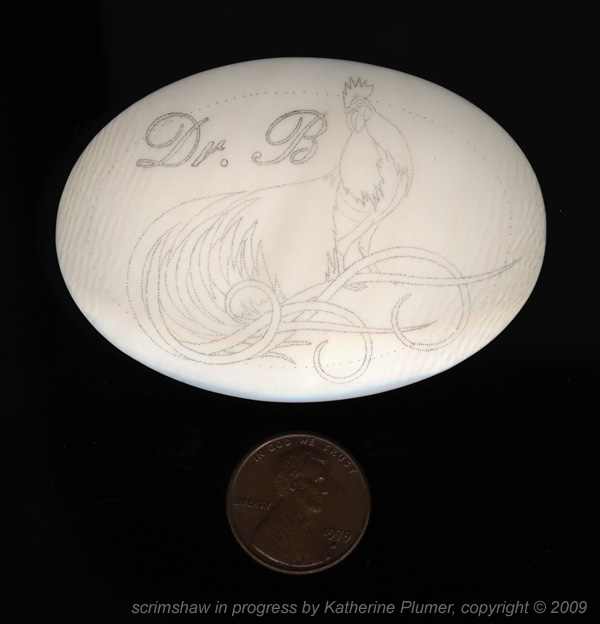
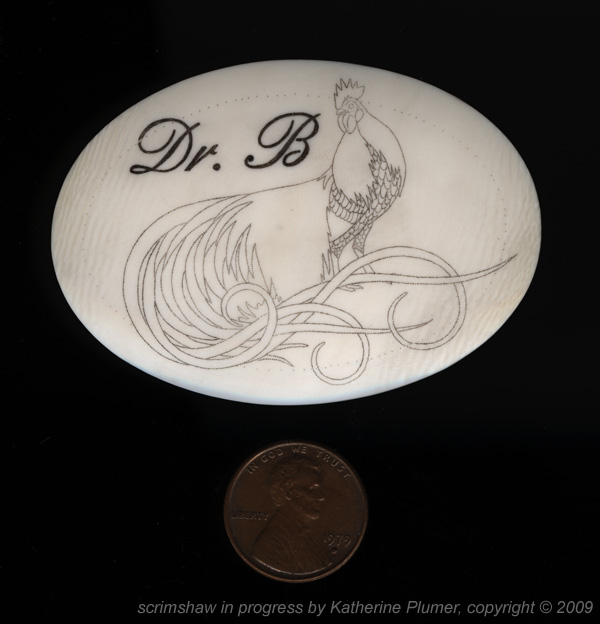
Transfered the outline:
Strengthened the outline so I can better see what I'm doing, and scrimmed the text in black:
Scrimmed all the black areas:
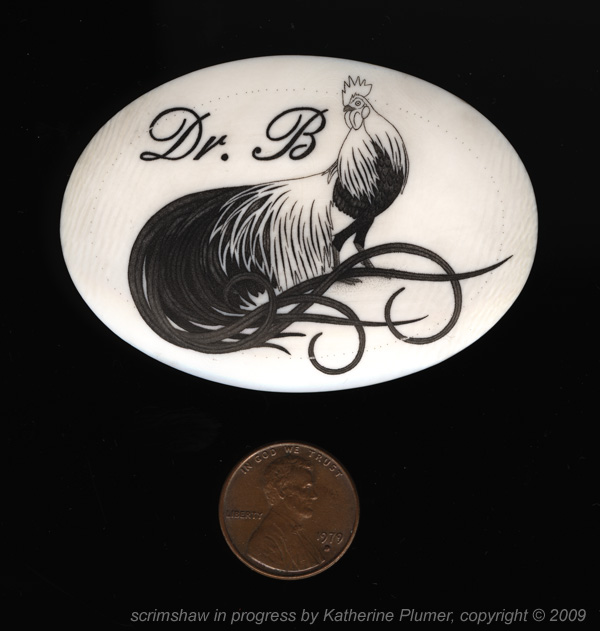
Added the green to the black areas so get that sheen that black feathers have:
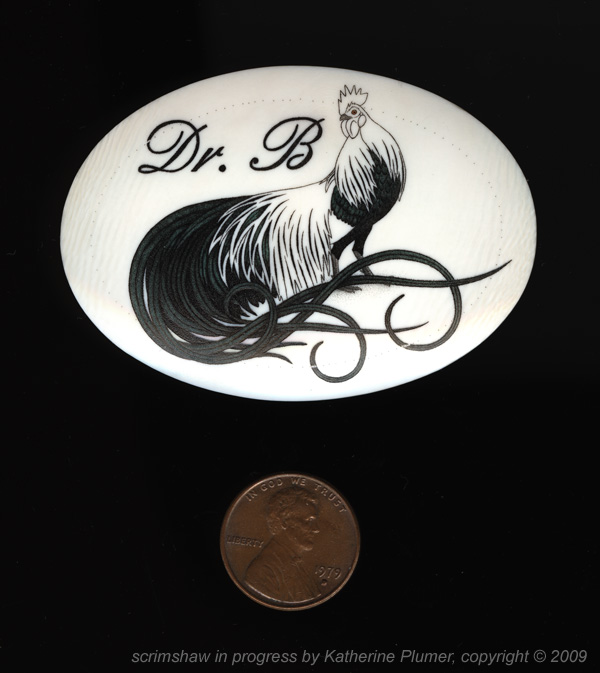
Scrimmed the gold areas with several colors of golden brown ink:

Scrimmed the bird's red face:
Now, to my absolute mortification, I found that the Higgin's red drawing ink does not stick. Crisis! Most colors will stick down in the engraved dots but buff off the surface. Well, this didn't stick at all. So I had to do a crazy concoction of red, yellow, and brown just to give it some staying power. It worked. Crisis averted. Whew. I will be shopping for another brand of red ink (that's so weird!) And as a side note, the inks are topped with a few layers of microcrystalline wax polish (which buffs down to a microscopically thin layer) to protect them.
All that was left at this point was the border, signature, and to place the ivory into the buckle itself!
I kinda lost track of how many colors went into this. At least 11, maybe 12. This might sound weird, but I'm just flat out amazed at how much this ends up being like a colored pencil drawing as far as the layering and everything, and I did not think I would be able to get this sort of look from scrimshaw. Love it!
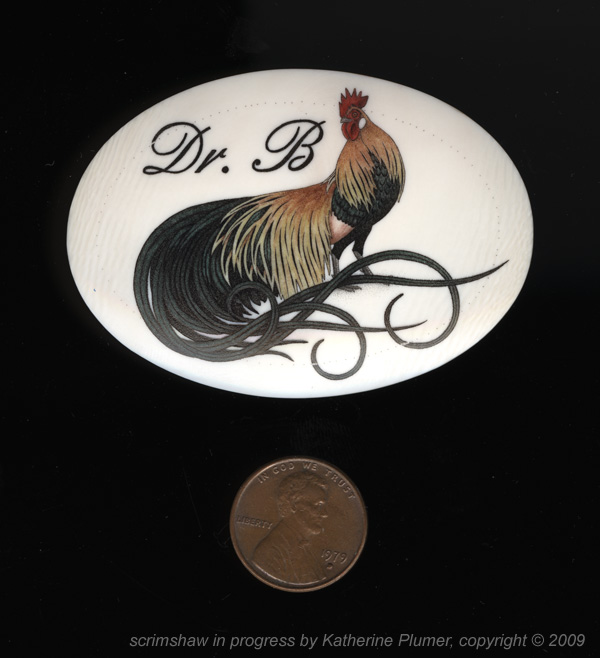
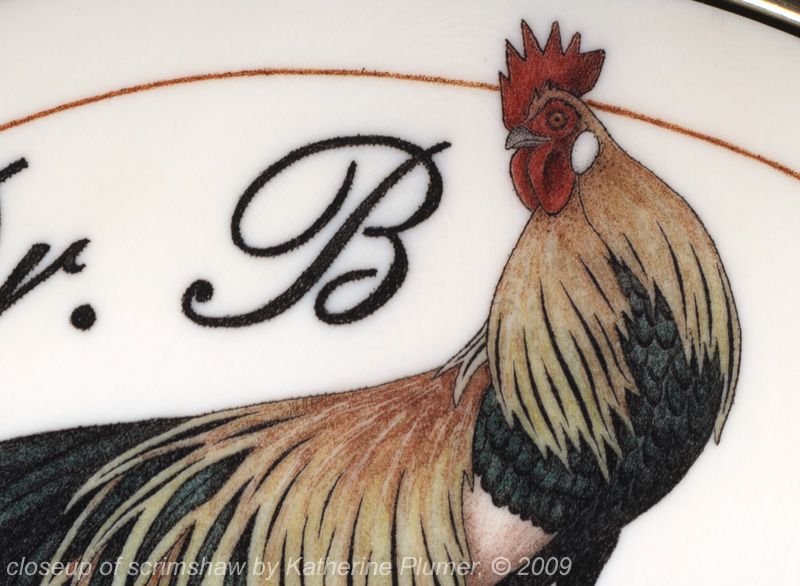
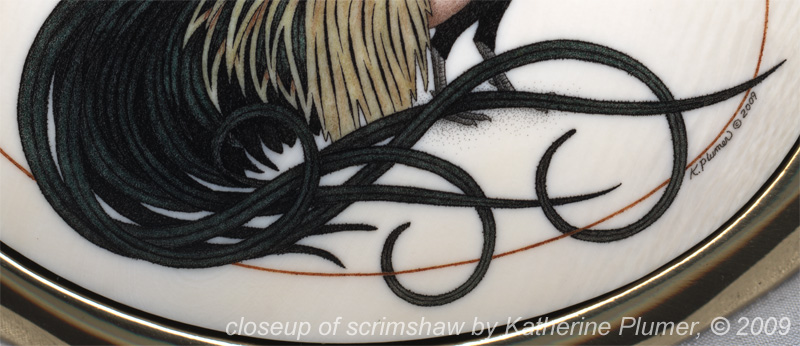
Here is the completed buckle, and some closeups (btw it's all dots):

Dr. B's belt buckle
multicolor scrimshaw on pre-ban elephant ivory
entire buckle is just over 2x3 at edges of brass, ivory inlay is 45x65mm
I have heard the phrase "over the moon" tossed around as a measure of how a recipient reacts to a piece, and I think that was definitely the case here. :big grin: This buckle is going to be a treasured piece.
Thanks for looking!
This project has been a long time in the making, but from the start there was no doubt as to what the subject matter should be. This piece was commissioned as a gift (from a group of people) to honor a professor of Avian Science who has done so much work for exhibition poultry, 4-H, and youth exhibitors over the years.... and who happens to have a particular fondness for belt buckles.
I knew that the Phoenix fowl has a special place in her heart, and thought that breed of chicken would make a great subject for the buckle. But how to do that.... How to fit a very "long" bird into that space. For a little history, this this is a breed I have depicted often in my art, in different poses and different formats. The American version of this bird can have a tail up to about 6 feet in length, but the ones you'd see at shows are usually much shorter than that.Often they are depicted with the tail streaming out behind in a long horizontal piece, or perched with the tail hanging down in a long vertical art piece:
This next one (deliberately not meant to match "Standard" descriptions, but positioned to fit a very specific shape of rectangle) obviously has a significantly shorter tail, that sweeps around beside him in this drawing:
I was thinking the bird for the belt buckle would be similar to this guy, but more horizontal in stance, with a longer more sweeping tail, and looking back over his shoulder to balance out the composition a little bit. Please don't laugh at this very rough sketch, everything starts out like this, and it's just a little thumbnail sketch:
So I started drawing that on a full sheet of paper, but just wasn't having any luck with it, I couldn't get it to look right with him turning his head that way. I got really frustrated, and then realized all I needed to do was turn the bird around so that he's looking over the other shoulder, like so:
Much better! That is the final mockup sketch. There were many in between which I'm not going to show you, but it was quite a long progression. As this is a belt buckle, which people tend to think of as being engraved metal, I wanted to incorporate some scrollwork, but I couldn't really follow the scrollwork "rules,", because it was more important that the bird have tail feathers that could be somewhat realistic, instead of just swirling off into totally fanciful scrollwork. So there was a pretty fine line of what I could do, and I went back and forth on how many feathers should be curled, how to intersect and overlap them, and eventually this is just what felt right, so I went with it. I was thrilled to find that font, because I could loop one of the letters around the border the same way that I did with the tail feathers.
So once I got that all finalized, it was time to start on the scrimshaw itself. I'm not going to talk about technique. I've done some tutorials, I've talked about it a lot, and certain things get to be my little secrets.
As a review though, remember that scrimshaw is the art of engraving on ivory/bone/synthetic. The engraved markings are then filled with ink, to create the image. Multicolor images are built up one layer at a time (JUST LIKE DRAWING!). Sometimes I work dark to light, sometimes light to dark, sometimes I skip around. It has more to do with where various colors are located in a piece I guess, so that I don't end up smearing things into places they shouldn't go. Here's how this one progressed:Transfered the outline:
Strengthened the outline so I can better see what I'm doing, and scrimmed the text in black:
Scrimmed all the black areas:
Added the green to the black areas so get that sheen that black feathers have:
Scrimmed the gold areas with several colors of golden brown ink:
Scrimmed the bird's red face:
Now, to my absolute mortification, I found that the Higgin's red drawing ink does not stick. Crisis! Most colors will stick down in the engraved dots but buff off the surface. Well, this didn't stick at all. So I had to do a crazy concoction of red, yellow, and brown just to give it some staying power. It worked. Crisis averted. Whew. I will be shopping for another brand of red ink (that's so weird!) And as a side note, the inks are topped with a few layers of microcrystalline wax polish (which buffs down to a microscopically thin layer) to protect them.
All that was left at this point was the border, signature, and to place the ivory into the buckle itself!
I kinda lost track of how many colors went into this. At least 11, maybe 12. This might sound weird, but I'm just flat out amazed at how much this ends up being like a colored pencil drawing as far as the layering and everything, and I did not think I would be able to get this sort of look from scrimshaw. Love it!
Here is the completed buckle, and some closeups (btw it's all dots):
Dr. B's belt buckle
multicolor scrimshaw on pre-ban elephant ivory
entire buckle is just over 2x3 at edges of brass, ivory inlay is 45x65mm
I have heard the phrase "over the moon" tossed around as a measure of how a recipient reacts to a piece, and I think that was definitely the case here. :big grin: This buckle is going to be a treasured piece.
Thanks for looking!


