
OK I have to eat crow here. Many of you guys told me to just make one. I didn't want to but I ended up being the one on the receiving end of sticker shock this time.
I will tell you this aint as easy as it looks. It certainly is not as easy as flare cutting the design and using it.
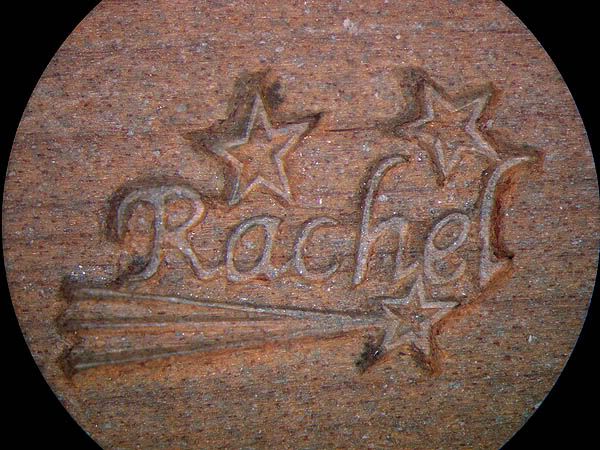
A lot of Rachel's turnings are small and I did not want to make several sizes of stamps so I made one stamp that she can use on little and big stuff alike.
We started out with Rachel picking a font for her name and designing what she wanted on her stamp. She decide on her name with three stars.

Then I took a piece of 3/8" 1095 tool steel and cut it to size, faced it off in the lathe and sanded the face.


To hold this long piece to engrave the end of it I used my cylinder engraving fixture with eh points taken out. This basically lengthened my vise jaws. I used a C clamp at the top to keep it rigid.

Next I transferred my design on and outlined the image with a 110 detailing point

Then I outlined it heavier and started the background removal process.

I finished lining off the background and then went to the grinder and ground the extra material from around the perimeter edges.

The background was removed and more was excess carved away from the perimeter. I tried a test stamping at this point and it just was too faint. It became obvious that I needed to make the text stand higher and take more away from the perimeter. so back to the bench.

I went to the rotary tool and used a tiny bur to contour the perimeter to the image as best I could and deepen the middle. Then another test stamp. Better but still not deep enough int eh middle.

You can't tell it form the photo but this one is about twice as deep as the previous step. I have a hard time getting depth shooting through one lense on my scope.
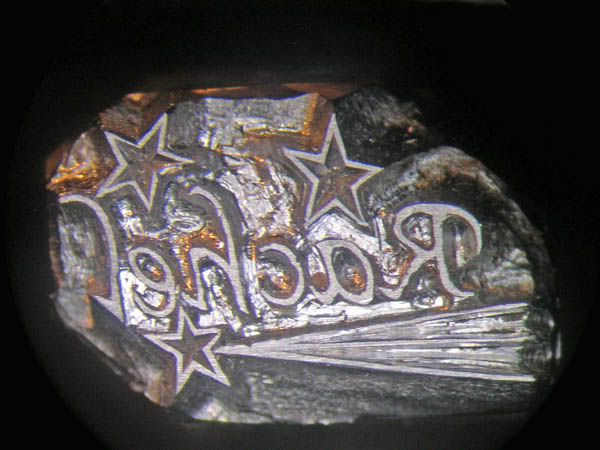
Well that one did it. We got a decent stamping this time. I have to put my glasses on to read it. I mean the stamped image is only about 5/16" across. With my glasses on it is a decent and sharp stamp.
I will tell you this aint as easy as it looks. It certainly is not as easy as flare cutting the design and using it.
A lot of Rachel's turnings are small and I did not want to make several sizes of stamps so I made one stamp that she can use on little and big stuff alike.
We started out with Rachel picking a font for her name and designing what she wanted on her stamp. She decide on her name with three stars.
Then I took a piece of 3/8" 1095 tool steel and cut it to size, faced it off in the lathe and sanded the face.
To hold this long piece to engrave the end of it I used my cylinder engraving fixture with eh points taken out. This basically lengthened my vise jaws. I used a C clamp at the top to keep it rigid.
Next I transferred my design on and outlined the image with a 110 detailing point
Then I outlined it heavier and started the background removal process.
I finished lining off the background and then went to the grinder and ground the extra material from around the perimeter edges.
The background was removed and more was excess carved away from the perimeter. I tried a test stamping at this point and it just was too faint. It became obvious that I needed to make the text stand higher and take more away from the perimeter. so back to the bench.
I went to the rotary tool and used a tiny bur to contour the perimeter to the image as best I could and deepen the middle. Then another test stamp. Better but still not deep enough int eh middle.
You can't tell it form the photo but this one is about twice as deep as the previous step. I have a hard time getting depth shooting through one lense on my scope.
Well that one did it. We got a decent stamping this time. I have to put my glasses on to read it. I mean the stamped image is only about 5/16" across. With my glasses on it is a decent and sharp stamp.
 graver handles. Nice series of photos showing an engraving process not many are familiar with. Thanks, Ray!
")
 That 's a nice & sharp stamp, Ray! Thank you for finding the time to create this very interesting tutorial


