Steps of carving a franklin half dollar

Billzach

Elite Cafe Member
Joined
Nov 8, 2006
Messages
510
Location
mayfield, ky
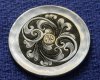
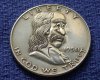
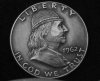
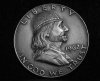
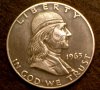
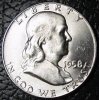
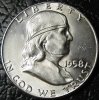
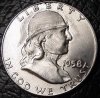
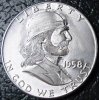
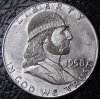
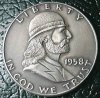
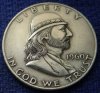
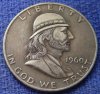
This is for all members, but especially for new engravers who have only hand push gravers..The franklin i,ll be carving is a 1958 uncirculated half dollar which i purchased on ebay for $6....The first picture is the franklin dollar before anything is marked or carved, the next one is where i make a rough design with a scribe and cut out a little below jaw, the next one is where i,ve cut as level as i can "into" the scribed marks..Everything i,ve done so far can be done with a hand push knife graver and a hand push #36 flat graver..I,ll add more pictures tomorrow as we design beard, hair and cloths...Remember this is a project especially for new engravers who have only basic tools...So get a franklin half and carve it with me and if it turns out nice you can sell it and upgrade your tools..[PS] I,ll be using my gravermax to cut hair and beard, but you hand push graver users can cut both with your push gravers..............................................................Next Steps, The next picture will show where i,ve cut hair, beard and cloths, etc.I,ve also cleaned up the field some and added a hatband......The next picture will show where i cleaned the field up level, stippled the hat, added lines to hatband, added some frown lines in back of eye and sanded field and rough spots on subject..Still looks a little rough, lets sand a little more, let,s burnish the lines and curves sandblast it and age it out and see what we got.....The finished recarved coin looks ready to sell.....Let,s see some pictures of your recarved frankilin..
 

Attachments

  • MVC-013F.JPG
    MVC-013F.JPG
    22.6 KB · Views: 229
  • MVC-014F.JPG
    MVC-014F.JPG
    22.5 KB · Views: 294
  • MVC-015F.JPG
    MVC-015F.JPG
    23.1 KB · Views: 307
  • MVC-017F.JPG
    MVC-017F.JPG
    23.3 KB · Views: 258
  • MVC-018F.JPG
    MVC-018F.JPG
    23.7 KB · Views: 268
  • MVC-019F.JPG
    MVC-019F.JPG
    22.1 KB · Views: 332
Last edited:

Billzach

Elite Cafe Member
Joined
Nov 8, 2006
Messages
510
Location
mayfield, ky
This is a good idea. Think I'll get one and try it myself.

Tim, be sure to post a picture your finished franklin..The collectors i sell to want xf, au, unc. etc. as host coins, but just a nice franklin will work, don,t use one that has dents, dings, scratches on it..
 

sdcoxx

Elite Cafe Member
Joined
Nov 10, 2006
Messages
295
Location
Glitter Gultch, Nv
Bill, As with all the masters, you make it look so easy. I've long studied and enjoyed your body of work at www.gmmnut.com. Your mastery of the flat field, hair, and unique designs have helped me improve as an engraver. How could I pass up an opportunity like this to study and learn from you?
I've attached two photos, one being my first finished attempt and two my final attempt.
Obviously, on the final attempt I focused on improving the field behind the hat and a smoother neck.
The toning agent used to age the coin, I just wiped with a tissue so as not to expose the numerous imperfections.
A couple questions:
1. What tool are you sanding the field with? 3m micro-finsihing belts? 3m sanding sticks? A super stone?
2. Explain burnish the lines and curves? Do you burnish the fields where I'm having so much difficulty?

Bill, I'd value any other tips or suggestions...

Thank you, Bill, for this lesson.
I look forward to the next one,
Stephen
 

Attachments

  • bb78 001_edited-1.jpg
    bb78 001_edited-1.jpg
    104.5 KB · Views: 184
  • bb79 001_edited-1.jpg
    bb79 001_edited-1.jpg
    115.6 KB · Views: 195
Last edited:

Glenn

Elite Cafe Member
Joined
Nov 9, 2006
Messages
714
Bill and Stephen,
Both of you are masters at carving these coins. I treasure your coins that are in my possession. I look and study them often. Keep up the great work and I'll keep collecting. Thanks, Glenn
 

Billzach

Elite Cafe Member
Joined
Nov 8, 2006
Messages
510
Location
mayfield, ky
Bill, As with all the masters, you make it look so easy. I've long studied and enjoyed your body of work at www.gmmnut.com. Your mastery of the flat field, hair, and unique designs have helped me improve as an engraver. How could I pass up an opportunity like this to study and learn from you?
I've attached two photos, one being my first finished attempt and two my final attempt.
Obviously, on the final attempt I focused on improving the field behind the hat and a smoother neck.
The toning agent used to age the coin, I just wiped with a tissue so as not to expose the numerous imperfections.
A couple questions:
1. What tool are you sanding the field with? 3m micro-finsihing belts? 3m sanding sticks? A super stone?
2. Explain burnish the lines and curves? Do you burnish the fields where I'm having so much difficulty?

Bill, I'd value any other tips or suggestions...

Thank you, Bill, for this lesson.
I look forward to the next one,
Stephen
Steve, your franklin carvings look super nice..I use 1/4 inch sanding sticks from gesswein on every coin i carve..I,m big on burnishing about everything on a carving except hair and beard.[ps] I don,t burnish field...A word about burnishing, it can really be helpful in engraving, but if not done right, it can make a mess out of your work..
 

Sam

Chief Administrator & Benevolent Dictator
Staff member
Joined
Nov 6, 2006
Messages
10,491
Location
Covington, Louisiana
This is a fantastic thread! Thank you for the photo series, Bill. And Stephen...yours is excellent! / ~Sam
p.s. Bill, with your permission I'd like to combine all photos into one for the Gallery. Do you mind if I do this?
 

sdcoxx

Elite Cafe Member
Joined
Nov 10, 2006
Messages
295
Location
Glitter Gultch, Nv
Practice, practice, and more practice...
For your Enjoyment this 2-sided 1950 Silver Franklin Half Dollar.
Stephen
 

Attachments

  • cc23 001_edited-1.jpg
    cc23 001_edited-1.jpg
    100.2 KB · Views: 222
  • cc23 003_edited-1.jpg
    cc23 003_edited-1.jpg
    105.1 KB · Views: 202

Mike Cirelli

~ Elite 1000 Member ~
Joined
Nov 8, 2006
Messages
1,690
Location
Western PA
Bill that's a nice little step by step and a good looking finished product. Steven also some good looking Franklins. Steven the Bill Zach background forget about it. He's uses the background fairy or pixey dust or something like that. Nobody else can get that stuff:)
 

threefingerdave

Elite Cafe Member
Joined
Feb 23, 2007
Messages
284
Location
North Idaho
A Try at your tutorial

Billzach
Here is my rendition of your coin
I see that i have some more work around the beard and hair. also my field around the back of his hat
but i would like your opinion on this
thanks
Dave
 

Attachments

  • DSCF0003web1.jpg
    DSCF0003web1.jpg
    16.5 KB · Views: 81

sdcoxx

Elite Cafe Member
Joined
Nov 10, 2006
Messages
295
Location
Glitter Gultch, Nv
Bravo Dave,
You and I are the ONLY Cafe Members to complete Bill's tutorial and post photos.....
Obviously, a positive learning experience and a better understanding of keeping the flat fields.
This is an excellent tutorial for anyone who wants to carve coins....
Bravo,
Stephen
 

CJ Allan

Elite Cafe Member
Joined
Jan 17, 2008
Messages
242
Location
Hazel KY
Well Hang on to yer hats Kiddz.....
Cause I'm planning on going up to Bills and pesterin' him for personal one-on-one lessons in the art of Coin Carving............

HE made the mistake of living only a few miles from me.....and then saying i can can come up to play with his new machines.........

Or.....at least I "think" thas' wut he said........heheheh

At least i'm gonna give it a good try at doin these coins... :)

..........cj
 

threefingerdave

Elite Cafe Member
Joined
Feb 23, 2007
Messages
284
Location
North Idaho
Billzach
thank you that was a really informative and fun tutorial.thanks again
Stephen
I agree with you
wow field work is tough
thanks again
Dave
 

threefingerdave

Elite Cafe Member
Joined
Feb 23, 2007
Messages
284
Location
North Idaho
after I Reworked him

Here it is after i reworked the hair, beard and field a little bit ...I think it looks better.
what do you think
Dave
 

Attachments

  • DSCF0002web.jpg
    DSCF0002web.jpg
    15.7 KB · Views: 87

John B.

Lifetime Pledge Member
::::Pledge Member::::
Joined
Nov 9, 2006
Messages
3,966
Location
Los Angeles area, California.
Stephen.
I marvel at and treasure the Franklin that you sent me for winning the contest.
It is a real gem, so smooth it looks fresh minted.
And thank you Bill for the wonderful carving tutorial. A great learning tool.
Your coins are amazing.
Best, John B.
 

threefingerdave

Elite Cafe Member
Joined
Feb 23, 2007
Messages
284
Location
North Idaho
Another try

Billzach,
Thanks for the great tutorial
I have learned alot from it
Here is another try at your coin
Please give me your honest opinions as that is how we learn
thanks
Dave
 

Attachments

  • DSCF0009web.jpg
    DSCF0009web.jpg
    21.2 KB · Views: 33
Top