
You are using an out of date browser. It may not display this or other websites correctly.
You should upgrade or use an alternative browser.
You should upgrade or use an alternative browser.
Transition style revisited
- Thread starter Ron Smith
- Start date

Dennis Sprague
Elite Cafe Member
Ron
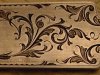
The piddling looks really nice. This looks like a antique makeup case that belonged to my grandmother.
I beleive it came from the New Orleans area. Do you use this mostly on jewelery.I havent seen much of this except on older peices of jewelery coming thru the shop for repair. When done right it's beautiful.Maybe this will get more engravers doing some of this style. Hope so .
Dennis
hmw
Member
Nice piddling Ron! Wish my piddler worked that good.
Mike Cirelli
~ Elite 1000 Member ~
Ron you put a new meaning to piddling. Beautiful cutting. What is the gravers of choice used for this work. Looks to me squares, flats and rounds.
Roger Bleile
~ Elite 1000 Member ~
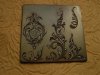
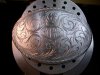
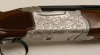
As I mentioned in the Transition Cut Rossi thread, I have been doing a version of it for several years. I had never heard the name "transition cut" and call it my double bevel cut. It is not identical to Ron's or Steichman's style but is essentially the same. The attached pics are of a cheap Spanish .410 I tried it on to see if it would look OK on a double with a close up of a scroll and a buckle with a close up. The third item is some black annodized aluminum stock I tested to see how it would look if cut through the finish on an airweight revolver. I cut all of this with a 90 degree square having a 65 degree face and 15 degree heel using my Gravermeister at 600 strokes per min. I'd be interested to get your feedback. I showed the .410 and the buckle at the Engrave-In and got some positive comments and heard the term "transition cut" for the first time.
Roger Bleile
Roger Bleile
Attachments
-
 Bevelcut 1.jpg94.7 KB · Views: 319
 -
 bevelcut2.jpg78.9 KB · Views: 307
 -
 Bevelcut buckle.jpg87.8 KB · Views: 302
 -
 Bevelcut buckle cu.jpg102.5 KB · Views: 268
 -
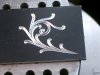 bevelcut alum.jpg53.5 KB · Views: 279
Last edited:
Andrew Biggs
Moderator
Hey Ron
That's some mighty fine piddling there Ron !!!
Roger, here's some feed back for you..............absolutley beautiful.
Weldon Lister does a similar thing with his inside line sculpting as well.
That's one of the very things I love about engraving is seeing all the wonderful styles and approaches/methods to the work. None of it is exactley the same and each individuals interpretation is different.
Just wonderful
Cheers
Andrew
steichman
Member
Roger,
Very nice!
Steve Teichman
Very nice!
Steve Teichman
Two strong points with this style are 1.) it's relatively fast to cut, and 2.) it's sculpted!
Christiaan
Elite Cafe Member
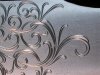
Now this is a style I REALLY like. Got some old world romance to it.
Our house has those molded steel ceilings. I would lay in bed and look up and think to myself. This so beautiful. They don't make ceilings as works of art anymore.
This style touch my soul. Like to see much more of it.
Our house has those molded steel ceilings. I would lay in bed and look up and think to myself. This so beautiful. They don't make ceilings as works of art anymore.
This style touch my soul. Like to see much more of it.
KCSteve
~ Elite 1000 Member ~
Trivia bit:
"Piddling" is used these days to denote someone just doing something while basically wasting time but it's a real term:
A 'piddle' is a pointed stick used to make a hole to drop a seed into. So 'piddling' is walking along with a pointed stick making holes for seeds.
Which means that Ron really was 'piddling' - using a pointed stick to plant the seeds of many future engravings!
You can essentially do this style with three gravers. Flat, shallow round, deep round. You can trim it with a 90 degree where ever it is needed. The shallow round is a very shallow round bottom tool, the deep round is simply taking an eighth inch carbide dowel and grinding it at a forty five degree face with a 15 to 20 degree lift, this facet being very short. The shallow round is difficult to get right as you need to be able to use the full face of an eighth inch dowel for hollowing the leaves. This tool is bit difficult to control.
You can do this style with a hammer and chisel, but there is a distinct advantage to using the power tools. They are perfectly suited and will create perfectly smooth cuts that are conducive to the effect you see in the examples.
You don't want shine in the cut as it will destroy the three dimensional effect although as a style, bright cuts add another possibility on the jewelry side of the style. On firearms, bluing enhances the look as you get an etch from the bluing process, particularly rust blue, which makes the three dimensional aspect pop, and adds to the illusion of depth.
Roger Bleile
~ Elite 1000 Member ~
For what it is worth, the graver I used on my work pictured was not highly polished. It was finished on the face and heel on a GRS 1200 grit diamond wheel. I use the power hone on the face but only drag the heel across the stationary wheel (motor off). Mine however does not have those sculpted cuts made with the rounds like Ron does. I'll have to give that a try.
Like Ron, I think this is best suited to engraving with power but I think it could be pushed in soft metals like peweter, silver and high karat gold. I have never tried it with H&C. However if it was hammered the progress marks might give it a more "hand chiseled" look that might be right for some projects like muzzle loaders.
If anyone else has examples of this style I'd sure like to see them.
RB
Roger, even with power, I often bottom the magnum handpiece out doing steel. I am not sure I would ike to try it by hand except for the h&c, but the brightcutters pick it up readily using the burin. The pressure on the wrist would be grueling doing it all day trying to get the width of cut that makes this style the most effective, if I am not misinterpreting what you are talking about. Pewter would be a snap, silver or copper wouldn't be too bad and high carat gold would submit to this style nicely like you said. Some alluminums according to alloy, but bronze would probably be a nightmare. By hand that is. The power tools or h&c will cut them all pretty successfully without much stress if you know what I mean and that is the beauty of this style.
roger, forgive my naivete, my man. i've never seen a cut quite like this. looks very nice to me . looks like something i'm going to practice drawing. thanks for showin this.
Weldon47
~ Elite 1000 Member ~
I like it. Both Ron & Roger are showing examples of work with lots of class. Once you are comfortable with this method of engraving you can cover some serious ground pretty quickly. This is where you can make some good $$$ as an engraver. You don't have to charge an arm & a leg for this kind of work (hence the term budget) and it doesn't take all day to do it either. This means that you can get it in and out the door and move on to the next project.
Put this one in your bag of tricks!
Weldon
Put this one in your bag of tricks!
Weldon
Roger Bleile
~ Elite 1000 Member ~
Monk (and anyone else who is interested),
At the Engrave-In I explained to a few folks how I draw this style then cut it. My first step is to draw all of the spirals. I do not draw any leaves or tendrals. The thing to keep in mind (as I do it) is that I never actually cut the spiral. I cut all of the leaves by eyballing their position starting with the innermost tip of the leaf then cut toward the spiral while tapering the cut to a fine point where the cut meets the pencil line of the spiral. I cut all of the inside leaves first starting with the largest leaf and work my cuts up the spiral until I get to the final inside lobe of the spiral which I cut last. Next I cut all of the outside leaves again starting away from the spiral and tapering the cut to a fine point where it meets the spiral formed by the inner leaves. There are primarily two cuts to each leaf, I start a leaf cut leaning my graver out then go back and start the cut with the graver leaned in. If I want more body to some leaves I add another set of outside and insided leaned cuts.
This is much more difficult to articulate in writing than it is for me to do it but I hope it helps. If there is enough interest I could do a step by step tutorial. Since it is somewhat unconventional I'm not sure our members are that interested. Anyway that is just the way I do my version. Ron Smith may have an entirely different (and possibly better) process.
Roger
lesholmes
Elite Cafe Member
Roger,
How did I miss your discussion at the engrave-in??
I vote for a step by step tutorial.
Regards,
Les Holmes
Montgomery, Alabama
How did I miss your discussion at the engrave-in??
I vote for a step by step tutorial.
Regards,
Les Holmes
Montgomery, Alabama
Andrew Biggs
Moderator
Hi Roger
A tutorial would be great thank you............
We're here to learn and anything you can contribute to the pool would be fantastic!!!
Cheers
Andrew
A tutorial would be great thank you............
We're here to learn and anything you can contribute to the pool would be fantastic!!!
Cheers
Andrew
KCSteve
~ Elite 1000 Member ~
Since it is somewhat unconventional I'm not sure our members are that interested.
Heck, that probably makes most folks more interested!
PAUL LANTUCH
Elite Cafe Member
- Joined
- Jun 2, 2008
- Messages
- 208
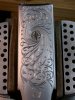
Is it the same style? I has no idea how to call it.
Engraved in 1985.
Engraved in 1985.
Attachments
-
 emMG_7619 (1).jpg49.5 KB · Views: 174
Sponsors


