AndrosCreations
Elite Cafe Member
- Joined
- Jul 14, 2010
- Messages
- 464
This may be nothing new to some of you... Infact, it may be more tedious than just using wire for inlay. But, since I was having some difficulty using wire, I tried this out of desperation and it worked (generally speaking) for me. I'm not saying I'm the first to do this because I don't know if anyone else has used the technique... But I'm the first in my own little engraving world 
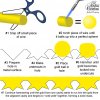
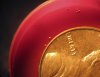
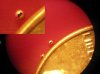
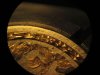
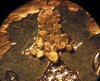
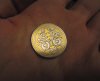
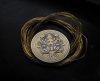
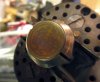
Using .32mm wire (28 gauge), I snipped 1/32" pieces off and balled them up on a soldering pad with my oxy/propane torch. I made over 200 of them and used them to inlay this coin (except for the outside gold border which is two helpings of the 28 gauge wire side by side.
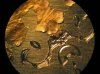
I would drill a little hole with my 120º graver, make 3 or more undercuts in the little hole, and pound in a "gold BB".
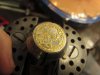
Regardless of whether it's efficient to do a whole background this way, this technique can be very helpful and efficient for those small radius curves that you don't want to use wire for.... So if nothing else, the technique does have it's place.
p.s. I thank Alain Lovenburg, Jeff Parke, and Jim Small for the inspiration to try gold background!
Using .32mm wire (28 gauge), I snipped 1/32" pieces off and balled them up on a soldering pad with my oxy/propane torch. I made over 200 of them and used them to inlay this coin (except for the outside gold border which is two helpings of the 28 gauge wire side by side.
I would drill a little hole with my 120º graver, make 3 or more undercuts in the little hole, and pound in a "gold BB".
Regardless of whether it's efficient to do a whole background this way, this technique can be very helpful and efficient for those small radius curves that you don't want to use wire for.... So if nothing else, the technique does have it's place.
p.s. I thank Alain Lovenburg, Jeff Parke, and Jim Small for the inspiration to try gold background!
Attachments
-
 Gold Inlay Ball Illustration.jpg227.8 KB · Views: 373
 -
 030 Size of Spheres.jpg65.6 KB · Views: 365
 -
 040 Size of Spheres 2.jpg48.1 KB · Views: 368
 -
 130 Inlay Border Scope.jpg75.9 KB · Views: 377
 -
 060 Spheres Started 2.jpg150.5 KB · Views: 388
 -
 090 Sphere In Place.jpg121.1 KB · Views: 378
 -
 170 Inlay Complete.jpg65.5 KB · Views: 365
 -
 290 Before Shading.jpg62.9 KB · Views: 378
 -
 310 Finished through scope.jpg165.1 KB · Views: 384
 -
 350 With Gold Wire.jpg92.8 KB · Views: 384
 -
 210 Inlay Flush.jpg65.4 KB · Views: 368
 -
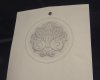 020 Drawing.jpg52.9 KB · Views: 361
Last edited: