
tsterling
Elite Cafe Member
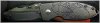
Here's a small Work-In_Progress on a new knife - this time a Columbia River Knife and Tool Co (CRKT) Burnley Squid. I'm trying to make this an affordable engraving, so it can be an Every Day Carry (EDC) knife for us mortals, and not end up being a "Safe Queen." The stainless steel handle scales are of 2Cr13 steel, and overall open length is 5.71". That's not familiar to me, but it turned out to engrave just fine. A little tougher during punch sculpting than the 410 or 416 stainless steel I'm used to, but not obnoxious at all. And at about $20 from Amazon or https://www.knivesplus.com/crktsquidcr-2490.html a pretty decent knife for a practice plate. Pretty acceptable quality-wise, too.

Here I've shimmed the handle scales so my pounding won't damage the mechanism, and cut the outlines. I've left the front bolster area clear of engraving so your thumb won't abrade it. Very important, I’ve also taped the very sharp blade. No matter how much care you give, you will eventually brush up against that blade - don't ask me how I know that.

Above, I’ve cut all the outlines and used a little solvent to get rid of my design transfer.

Here I’m beginning the process of sculpting the spider body in Japanese-style shishiaibori (sunken relief). Shishiaibori is characterized by a sculpted carving below the surface of the metal, and outlined by very deep cuts. At the blue arrow, you can see my original (single) outline cut. The red arrow shows where I’ve used a narrower V-graver and cut a second time, deepening the original cut but not widening the cut.

Above, I’ve deepened all the outside lines, and I’m beginning to carve away the interior corner surfaces. Then I followed up with a small sculpting punch smoothing the surfaces, leaving a pleasing texture.

Above is a simplified graphic explaining the Shishiaibori technique.


Here’s the spider body finished. I’ve used flat gravers to carve away the excess steel on the edges, and then smoothed everything with a tiny steel punch.

Above, you can see the first cut with a flat graver removing the top corner around the outside of a spider leg segment (the blue arrow). The graver is held at about a 45 degree angle for this first cut, and cutting close to the bottom of the deep outlining cut. I’ll go back again with the flat graver held at a shallower angle to cut the top corner again, then sculpt with a punch, leaving a nice texture.


Here in the left image, you can see the legs fully trimmed and sculpted. In the right image, I added shading cuts on the legs and a big 24 karat gold eye…


And, finally after three days of engraving, here’s the CRKT Squid "Widowmaker" knife in all its glory.
Thanks for Looking!
Here I've shimmed the handle scales so my pounding won't damage the mechanism, and cut the outlines. I've left the front bolster area clear of engraving so your thumb won't abrade it. Very important, I’ve also taped the very sharp blade. No matter how much care you give, you will eventually brush up against that blade - don't ask me how I know that.
Above, I’ve cut all the outlines and used a little solvent to get rid of my design transfer.
Here I’m beginning the process of sculpting the spider body in Japanese-style shishiaibori (sunken relief). Shishiaibori is characterized by a sculpted carving below the surface of the metal, and outlined by very deep cuts. At the blue arrow, you can see my original (single) outline cut. The red arrow shows where I’ve used a narrower V-graver and cut a second time, deepening the original cut but not widening the cut.
Above, I’ve deepened all the outside lines, and I’m beginning to carve away the interior corner surfaces. Then I followed up with a small sculpting punch smoothing the surfaces, leaving a pleasing texture.
Above is a simplified graphic explaining the Shishiaibori technique.
Here’s the spider body finished. I’ve used flat gravers to carve away the excess steel on the edges, and then smoothed everything with a tiny steel punch.
Above, you can see the first cut with a flat graver removing the top corner around the outside of a spider leg segment (the blue arrow). The graver is held at about a 45 degree angle for this first cut, and cutting close to the bottom of the deep outlining cut. I’ll go back again with the flat graver held at a shallower angle to cut the top corner again, then sculpt with a punch, leaving a nice texture.
Here in the left image, you can see the legs fully trimmed and sculpted. In the right image, I added shading cuts on the legs and a big 24 karat gold eye…
And, finally after three days of engraving, here’s the CRKT Squid "Widowmaker" knife in all its glory.
Thanks for Looking!
Attachments
-
 CRKT_Burnley_Squid_Skull_Spider_Blog_4.jpg56 KB · Views: 396


