Third bulino attempt

oniemarc

Elite Cafe Member
Joined
Mar 29, 2021
Messages
367
Location
The Netherlands
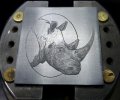
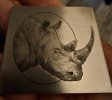
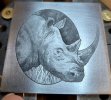
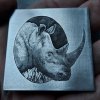
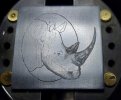
So...I started another little bulino sideproject. Last one was the elephant which was really fun to do. When I started cutting the elephant, I cut the outlines for this rhino on the back of that same plate. I know that one of the comments on the elephant warned me about cutting outlines, because it looks a bit off. Since I had already cut the outlines for this, I had to try and hide some of those lines. Some spots it worked out, some spots it didn't. Next one will be without lines to start from...hahaha.

Background still needs to be done and I need to refine it here and there, but It starting to look like a rhino.

Feel free to tear it apart, as I learn from all comments.

Marc

*last photo is wat to dark...but I had some poor lighting in the living room...ahum
20211129_210037.jpg 20211129_210104.jpg 20211129_210130.jpg
 

John B.

Lifetime Pledge Member
::::Pledge Member::::
Joined
Nov 9, 2006
Messages
4,001
Location
Los Angeles area, California.
Very nicely done. The only place I find the outline a bit harsh is from the ears down to the upper horn.
And this may improve when you work out the background.
Please show a picture of the tools you use to create the dots, texture, shadows and fine lines.
Would be very interesting to see what you work with.
 

oniemarc

Elite Cafe Member
Joined
Mar 29, 2021
Messages
367
Location
The Netherlands
Very nicely done. The only place I find the outline a bit harsh is from the ears down to the upper horn.
And this may improve when you work out the background.
Please show a picture of the tools you use to create the dots, texture, shadows and fine lines.
Would be very interesting to see what you work with.
I will get some pictures in the morning, since my kid just went to bed...hahaha. He'll be up all night if I start playing around right next door.

I can sum up what I used though...

The outlines were cut with a 120 degree parallel carbide graver. The hairlines within the first "layer" were cut with that same graver.
Then I crosshatched the darkest shaded parts by hand with a 90 degree bulino graver...no heel...
The dots were done with a discarded 120 carbide graver which I somewhat rounded and then sharpened to a point. Actually came in quite handy as the top of the 120 is ground down, so as soon as I rounded it off a bit, I got some clearance to see what I am doing. Some...not alot. Dots were done with a bigger stroke and low pressure with my "machine".
 

monk

Moderator
Staff member
::::Pledge Member::::
Joined
Feb 11, 2007
Messages
10,962
Location
washington, pa
i agree with jb. the line from the ear down is quite harsh. however, a bit of creativity with the background could save the day. this is a very handsomme job imho.
 

John B.

Lifetime Pledge Member
::::Pledge Member::::
Joined
Nov 9, 2006
Messages
4,001
Location
Los Angeles area, California.
Thank you for your answers and I agree with both Monk and Sam.
Will look forward to seeing pics of your tools, they sound interesting.
Also looking forward to see what you decide for a background for your wonderful rhino.
 

oniemarc

Elite Cafe Member
Joined
Mar 29, 2021
Messages
367
Location
The Netherlands
Thanks to all taking the time to have a look and reply. It is much appreciated.

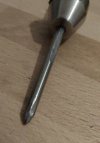
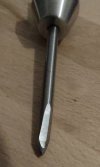
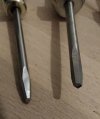
I included some pictures of the gravers I used. Not the best pics, but I hope you can see clearly enough. The one with the botched up tip is the stippling "tool". In the picture with 2 gravers...the left is the bulino "no heel" and the right graver is the 120 parallel.
I do the handpushing with an old chinese knockoff I got from my wife(she was trying to help...) from which I cut the hose. Still need to make me a nice handle for handpushing, but can't find the time nor motivation to get behind the lathe atm.
The rest was done with my "Voldemort" handpiece. So no pictures of those as I promised Mr. Alfano not to post them in case the might be infringing patents and such.

I did however order me a Classic last sunday, so that should be coming soon enough....super stoked.

*edited....because I just realised I took the picture with a 116 degree graver...my bad. 20211130_083313.jpg 20211130_083302.jpg 20211130_083247.jpg
 
Last edited:

oniemarc

Elite Cafe Member
Joined
Mar 29, 2021
Messages
367
Location
The Netherlands
i agree with jb. the line from the ear down is quite harsh. however, a bit of creativity with the background could save the day. this is a very handsomme job imho.
In the reference picture I used, the background is almost black on the top half of the image. The bottom is more a grassy slightly out of focus type of background. So I think I'll keep to that and see if it hides that line.

Marc
 

oniemarc

Elite Cafe Member
Joined
Mar 29, 2021
Messages
367
Location
The Netherlands
Good anatomy on the Rhino. J.J.
Can't take credit for that, as I used a reference picture to reproduce the "framework" so to speak. I tend to like that way of working when doing somewhat realistic work. Less mistakes slip in when doing so, so less to correct halfway through shading.

Marc
 

papart1

:::Pledge Member:::
::::Pledge Member::::
Joined
May 23, 2015
Messages
1,406
Location
Michigan
WOW...........nice...........I gotta really gotta get with it man!!!!! thanks for sharing with us. Rob
 
Last edited:

John B.

Lifetime Pledge Member
::::Pledge Member::::
Joined
Nov 9, 2006
Messages
4,001
Location
Los Angeles area, California.
Well done. Much better on the upper outline from ears to horn.
The outline is still a little too noticeable next to the grass area and at neck and back above the ears.
A little darkening of the shadow next to the animal above the ears, like you have below the ears ,should fix this.
Great work and I'm sure you will correct this hard outline problem on your next one.
All part of our learning curve.
And I'm still learning everyday after75 years of engraving. HA ha.
 
Last edited:

oniemarc

Elite Cafe Member
Joined
Mar 29, 2021
Messages
367
Location
The Netherlands
Well done. Much better on the upper outline from ears to horn.
The outline is still a little too noticeable next to the grass area and at neck and back above the ears.
A little darkening of the shadow next to the animal above the ears, like you have below the ears ,should fix this.
Great work and I'm sure you will correct this hard outline problem on your next one.
All part of our learning curve.
And I'm still learning everyday after75 years of engraving. HA ha.
Still have lots to do on this little fella, so I'll see how far I can get with hiding everything. Next one will not be lined like this, that's for sure. If I hadn't lined it when I did the elephant, this one would have looked quite different from the start. But I do think this is being good practice, since now I have to think about hiding mistakes in a whole different way.

Marc
 

oniemarc

Elite Cafe Member
Joined
Mar 29, 2021
Messages
367
Location
The Netherlands
Quite harsh lighting, but I hope you can see enough. I really need to save up for a good camera and make some sort of lightbox for taking these pictures...
Anyways, tried to fix some more of the outlines and had to redo some of the shading. I had me a little accident when inking the engraving...grabbed the wrong ink which dried right away, leaving a big blob of dried ink I could get off. Had to sand it down. Lesson learned, look at what you reach for.

Marc


20211205_154349.jpg
 

Latest posts

Sponsors

FEGA
Top