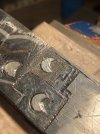
Second silver inlay practice

Golabekrafts

Member
Joined
Oct 25, 2021
Messages
34
Hello everyone!

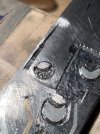
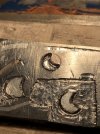
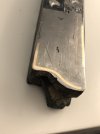
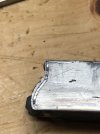
Just thought I’d share this quick video I made during my practice work today. This is my second attempt at making a silver inlay moon in wrought iron. The practice is for a tsuba I have planned out. Still within my first 20 hours of engraving practice, I accidentally broke a tip for the first time applying too much pressure trying to break a chip out.
The video doesn’t show everything, but if anyone has any pointers that is always appreciated!


monk

Moderator
Staff member
::::Pledge Member::::
Joined
Feb 11, 2007
Messages
10,967
Location
washington, pa
difficult to judge by the video, but i'd say you were going rather deeply for an inlay. good mtl. for practice is to use copper. properly annealed, it should give you all the practice needed, but at a lower price.
 

Golabekrafts

Member
Joined
Oct 25, 2021
Messages
34
difficult to judge by the video, but i'd say you were going rather deeply for an inlay. good mtl. for practice is to use copper. properly annealed, it should give you all the practice needed, but at a lower price.
So perhaps just deep enough that I can get it properly set, and reduce the amount of inlay material used to compensate?
 

monk

Moderator
Staff member
::::Pledge Member::::
Joined
Feb 11, 2007
Messages
10,967
Location
washington, pa
undercutting borders and cutting opposed "teeth" in the inlay area is one way. check the tip section. i think there's videos showing how this is done. there are surely videos on line showing this.
 

Andrew Biggs

Moderator
Joined
Nov 10, 2006
Messages
5,035
Location
Christchurch, New Zealand
Wow!!! That was awesome!!!!

I love it……That has to be the most cack handed, roughest way I have ever seen gold inlayed. And the thickest chunk of silver I’ve ever seen to do the job.…….And yet it seemed to work :)

And that is all that matters.

From what I can see the silver held in place which is the most important thing.

Well done :)

So if you want to refine the process.

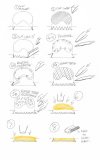
1. Decide how thick the inlay (precious metal) will be. Build a safety margin in so roughly about 0.5mm should do it for what you are try to achieve (a bit deeper if you want). The safety margin is there to make sure less things go wrong

You can hammer that piece of silver flat and make it go a long way. It will work harden so you will have to anneal to make it soft again.

2. Cris cross the inlay cavity area with a square graver (V point)…….go down less than 0.5mm because you want the inlay which is 0.5 to protrude above the surface when pounded in.

3. Flat graver to dig out the metal…..I would suggest a slightly smaller on if possible

Your flat graver heel should only be about 0.3 mm long……..keep it small and sharp.

4. Go all the way around the edge and undercut using a tool shaped like a screwdriver. You don’t need to pound the living crap out of it. The idea is to have the walls of the cavity at an angle like a dovetail joint in woodwork

5. Raise small teeth at the bottom of the cavity. The trick here is to make them sharp so they catch the silver.

The teeth must be small because if they protrude above the surface they will poke through the silver…….and if you blue the piece afterwards they will be really noticeable. That is why you build in a safety margin.

6. Cut silver to the inlay shape……….Or if you use thin wire then inlay the wire.

7. Hammer in place.

8. Sand off flush with the surface.

Be careful here as you can dish out the silver ( centre of inlay lower than edges). Make sure to use a small stone or wet N dry back with something solid like brass (do not use oil as this helps to dish it out)

You are on the right track and a bit of refinement and a bit more practice and you will be there :)

Cheers
Andrew
 

Golabekrafts

Member
Joined
Oct 25, 2021
Messages
34
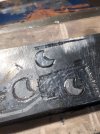
latest attempt, going to do one more later today and hopefully get some sharper corners when I use a smaller graver. All in this one took about 30minutes


AllenClapp

Elite Cafe Member
Joined
Aug 7, 2019
Messages
399
Location
Raleigh, NC
Wow!!! That was awesome!!!!

I love it……That has to be the most cack handed, roughest way I have ever seen gold inlayed. And the thickest chunk of silver I’ve ever seen to do the job.…….And yet it seemed to work :)

And that is all that matters.

From what I can see the silver held in place which is the most important thing.

Well done :)

So if you want to refine the process.

1. Decide how thick the inlay (precious metal) will be. Build a safety margin in so roughly about 0.5mm should do it for what you are try to achieve (a bit deeper if you want). The safety margin is there to make sure less things go wrong

You can hammer that piece of silver flat and make it go a long way. It will work harden so you will have to anneal to make it soft again.

2. Cris cross the inlay cavity area with a square graver (V point)…….go down less than 0.5mm because you want the inlay which is 0.5 to protrude above the surface when pounded in.

3. Flat graver to dig out the metal…..I would suggest a slightly smaller on if possible

Your flat graver heel should only be about 0.3 mm long……..keep it small and sharp.

4. Go all the way around the edge and undercut using a tool shaped like a screwdriver. You don’t need to pound the living crap out of it. The idea is to have the walls of the cavity at an angle like a dovetail joint in woodwork

5. Raise small teeth at the bottom of the cavity. The trick here is to make them sharp so they catch the silver.

The teeth must be small because if they protrude above the surface they will poke through the silver…….and if you blue the piece afterwards they will be really noticeable. That is why you build in a safety margin.

6. Cut silver to the inlay shape……….Or if you use thin wire then inlay the wire.

7. Hammer in place.

8. Sand off flush with the surface.

Be careful here as you can dish out the silver ( centre of inlay lower than edges). Make sure to use a small stone or wet N dry back with something solid like brass (do not use oil as this helps to dish it out)

You are on the right track and a bit of refinement and a bit more practice and you will be there :)

Cheers
Andrew
Andrew, would you elaborate on your last warning not to use oil? Does this apply only to sandpaper backed with a hard surface or to a stone as well? Why does oil help to dish out the inlay? Does water have the same issue?
 

Andrew Biggs

Moderator
Joined
Nov 10, 2006
Messages
5,035
Location
Christchurch, New Zealand
Allen..............The not using oil tip was given to me by Phil Coggan many years ago. Not sure why it works but it does. Maybe something to do with a build-up of accumulated crud between the inlay and sandpaper. I've never used water as metal is allergic to it so I don't know if the same applies. :)

Golabekrafts.........You seem to be doing some unnecessary steps there, especially at the beginning. Or maybe I'm just not seeing it correctly. I'm not sure what you are doing at the beginning. I will try and post something to clarify the process :)

You may want to rethink the use of a chisel and file to take off the excess silver..............On a finished piece of work you will leave huge gouges and cut marks in the surface of your metal. They will be an absolute bastard to get out. I would suggest starting with 240 grit automotive wet n dry paper and as you get closer to the work surface work down to 400/800/1200.....and finish with polishing paper depending on what finish you are trying to achieve.

It is good practice to get the process as correct as you possibly can.........You are working in what seems to be fine silver. Which is soft like gold. It will work harden but not much and it spreads very easily as you can see.. If you start moving into harder metals like coloured golds, copper etc, then your techniques must be exact otherwise the metal will work harden instantly and give you a whole world of pain.

As for time........don't worry about it. It is what it is. A lot of people think the value/cost of gold/silver/etc inlay is in the precious metal. It isn't because the amounts used are small. The true cost is in the time it takes to do it :)

Cheers
Andrew
 

Golabekrafts

Member
Joined
Oct 25, 2021
Messages
34
Ah so I did the order a bit wrong on parts of it, first I did outline, then I raised a burr/the walls dovetail, then I tried to clear the inside, followed by a final pass around the walls to make them overhanging, and then I raised the teeth on the bottom to grab the material. I’m going to try doing some in bronze next with a solid piece instead of the wire (my project consists of one bronze sun and one silver moon inlay)
 

Golabekrafts

Member
Joined
Oct 25, 2021
Messages
34
Latest attempt, next week I’ll have a drawplate arriving so I’ll be able to do some work with more appropriate thickness wire
 

Attachments

  • EBBA16FD-0C85-4C68-961D-3C9CB2BECD7D.jpeg
    EBBA16FD-0C85-4C68-961D-3C9CB2BECD7D.jpeg
    213.4 KB · Views: 31
  • E068DD2B-764A-4903-8A05-CEB737251226.jpeg
    E068DD2B-764A-4903-8A05-CEB737251226.jpeg
    203.3 KB · Views: 30
  • 75D25F47-EA80-4C43-9F18-AF92FF89660C.jpeg
    75D25F47-EA80-4C43-9F18-AF92FF89660C.jpeg
    169.6 KB · Views: 30
  • 9861D7E0-8A89-451D-8C39-5C58DC09B58D.jpeg
    9861D7E0-8A89-451D-8C39-5C58DC09B58D.jpeg
    146.9 KB · Views: 32
  • 6EEE4564-9115-46EE-9081-D196D5AE8CFB.jpeg
    6EEE4564-9115-46EE-9081-D196D5AE8CFB.jpeg
    167.4 KB · Views: 33

PS_Bond

Elite Cafe Member
Joined
Jan 5, 2007
Messages
130
Location
Southampton, UK
Ah so I did the order a bit wrong on parts of it, first I did outline, then I raised a burr/the walls dovetail, then I tried to clear the inside, followed by a final pass around the walls to make them overhanging, and then I raised the teeth on the bottom to grab the material. I’m going to try doing some in bronze next with a solid piece instead of the wire (my project consists of one bronze sun and one silver moon inlay)

Another way I've been taught (using tagane, but I suppose there's no reason not to use Western tools for it) is to scribe an outline for a section, cut that portion of the outline, raise a lip using shaped blunt tagane (in this case, quite a high burr as it's for hon zogan). That provides something to push the inlay piece into, keeping it in place while scribing around the rest of the zogan, then cutting the rest of the outline & excavating. Oh, and the inlay piece (again - for this style) is fractionally bevelled, rather than relying upon displacing the inlay into an undercut.

Andrew's method(s) are less of a pest though. Also, superglue works if you're having issues keeping the inlay still while scribing :)
 

Golabekrafts

Member
Joined
Oct 25, 2021
Messages
34
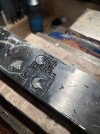
Finally got a drawplate, and successfully did this (1.1mm phosphor bronze inlay to wrought iron) man does it help to have properly sized wire ! When I first purchased my wire I didn’t really know enough about what I was planning on doing and had gotten stuff that is way too thick.
I know it is super close to the edge, I was just testing to see how close it can be before I start getting problems. At this point I think I’ve just got to continue putting in the practice, thank you all for the tips!
 

Attachments

  • 4A1CBB82-966F-458B-B262-143A1A495346.jpeg
    4A1CBB82-966F-458B-B262-143A1A495346.jpeg
    70.2 KB · Views: 47
  • 656D7804-E6EB-4200-9A57-7B6DD3F12B83.jpeg
    656D7804-E6EB-4200-9A57-7B6DD3F12B83.jpeg
    115.7 KB · Views: 46

Heimdahl9

New Member
Joined
Jul 29, 2021
Messages
1
Hello everyone!

Just thought I’d share this quick video I made during my practice work today. This is my second attempt at making a silver inlay moon in wrought iron. The practice is for a tsuba I have planned out. Still within my first 20 hours of engraving practice, I accidentally broke a tip for the first time applying too much pressure trying to break a chip out.
The video doesn’t show everything, but if anyone has any pointers that is always appreciated!
practice more before you attack inlay in iron
 

Golabekrafts

Member
Joined
Oct 25, 2021
Messages
34
This is my practice.. why not practice on the material I’m working with for my first project?
 

PS_Bond

Elite Cafe Member
Joined
Jan 5, 2007
Messages
130
Location
Southampton, UK
The only reason I can think of for not working in wrought for practice is because it's usually a hoarded material. Personally, I experiment in mild and save the wrought for projects, but each to their own. I think you're making a rod for your own back with phosphor bronze though, it's a sod for work hardening.
 

Golabekrafts

Member
Joined
Oct 25, 2021
Messages
34
The only reason I can think of for not working in wrought for practice is because it's usually a hoarded material. Personally, I experiment in mild and save the wrought for projects, but each to their own. I think you're making a rod for your own back with phosphor bronze though, it's a sod for work hardening.
Oh I’m planning on eventually removing the inlays in this practice bar, this wrought iron was a wagon wheel at one point and is not the highest quality, so I’ll be re-using it and folding etc to get some material for future projects.
 

Latest posts

Sponsors

FEGA
Top