
oniemarc
Elite Cafe Member
Thank you very much...got a long way to go thoughpretty sweet Oniemarc..............
Thank you very much...got a long way to go thoughpretty sweet Oniemarc..............
Those are almost the exact words told to me by Ken Hurst when I said I was so afraid of making a mistake on a piece. He then proceeded to grill me on my engraving technique. I certainly miss the old boy.I was told by by boss when i was working as a cabinetmaker..”the mark of a true master craftsman is how they cover up their mistakes. Anybody can follow a set of plans.”
Yes there is. I'm a Hershey's syrup fan, no offense to the Nestle's Quikkers (even tho you're WRONG). It's also my favorite way to use one or two overripe bananas. I mix 'em in with a stick blender, put it in the freezer for a few hours until it's pretty slushy, then blend it again. It tastes like a decadent milkshake, but it's actually pretty healthy.
I'm really surprised no one has said so, but you could easily teach shading at master level. Maybe you do?Me uniré a este hilo si me lo permite, todavía tengo mucho que aprender pero estoy poniendo todos los deseos e intereses del mundo en él. Este trabajo tiene poco tiempo desde que lo terminé y es mi primer cuchillo, también es la primera vez que comienzo a lograr un sombreado del cual no me avergüenzo, aún no he publicado imágenes en este foro, ya Lo publiqué en su momento en el grupo de Facebook por lo que es posible que ya lo hayan visto, de la misma manera que me atreví a hacerlo. Muchas gracias a todos los dioses de esta maravillosa profesión por existir e inspirarnos a desarrollarnos. Criticism of any kind will always be well received, especially if it helps to improve. View attachment 48116

Thank you very much...much too kind.You have some used some very advanced techniques and artistry in the presentation of this scroll.
Congratulations on it and your shading.
You might consider using a needle point stipple and ink on the background if you want to darken it for higher contrast.
Thank you very much Goldjockey, your words are very encouraging, sorry for the delay in answering. I certainly hope one day to get to the point of being qualified to teach someone. In the meantime I will do my best to gain that experience. I am also very grateful that there are sites like this where there is so much information and valuable people willing to help those of us who are just starting out.Estoy realmente sorprendido de que nadie lo haya dicho, pero podrías enseñar sombreado fácilmente a nivel de maestro. ¿Tal vez lo hagas?
Ciertamente me inscribiría. ¡Tu trabajo es asombroso, atractivo y absolutamente del siguiente nivel!
La profundidad y el carácter de esta pieza en particular son impresionantes. Soy un viejo platero con experiencia limitada en el grabado a mano. Sin embargo, a lo largo de los años he had the privilegio de ser aprendiz, trabajar hombro con hombro y diseñar para algunos artesanos realmente increíbles. Lo que sé es que claramente ha creado una obra maestra aquí. Es necesario decirlo y reconocerlo.
Me encanta el trabajo y espero ver más.
Yes, you can sharpen a carbide bur to the point of the needle and use it to dot the background, I have not used this method for the background, what I do is place some facets on the tip of the bur after grinding it, this works similar to a bur, try it, it is a Pitbull to eliminate the background, you can make them of different sizes for the most intricate areas, there is an interesting effect of tool cuts in the background and then you decide if you make points or not.Maybe a carbide single point would be better?
I will give it ago, aps I don't have any M-42 at the moment. Will try and order that too, see what works best for me. Have alot of stippling to do for my next "project".Yes, you can sharpen a carbide bur to the point of the needle and use it to dot the background, I have not used this method for the background, what I do is place some facets on the tip of the bur after grinding it, this works similar to a bur, try it, it is a Pitbull to eliminate the background, you can make them of different sizes for the most intricate areas, there is an interesting effect of tool cuts in the background and then you decide if you make points or not.
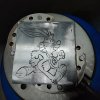
your shading here, combined with the background, really makes this popI did finish the round design today...so I might aswell show the endresult. As predicted, I messed up here and there...ahum.
Here's a short list of what I know I did wrong...
Border needed to be shaded further
I messed up some of the shading lines which result in a somewhat messy look.
Background removal is simply so so.
I think I could have gone slightly darker with the shading, but I was concentrating on getting thin lines....lesson learned(not always a good thing)
Overall I see alot of improvement over my last plate and am pretty pleased with the outcome. Not satisfied by a long shot, but as long as I'm improving....I'm well happy View attachment 48161
Thank you for the kind words, much appreciatedyour shading here, combined with the background, really makes this pop


