Tips, help, advice on clean cutting.

Dani Girl

:::Pledge Member:::
::::Pledge Member::::
Joined
May 6, 2012
Messages
1,251
Location
NSW, Australia.
On the last few engravings I've been doing I've been noticing quite a bit of the time I have been dragging my belly/heel thing accross the scroll edge I am still cutting before I get to the end of my turn.

I also have the problem of the rotary tool rubbing up lips of metal which I have to go back over and cut off or something.

When cutting deep relief with a deep background, the initial cuts cant be very deep because when the scrolls cross over one another you want the lines small so it's pretty.

So do you cut away beside the background with a 90 or 120 bevelled steeper or to the same angle you cut the initial scrollwork?

I often run into my scroll sidewalls with the rotary and try to recut them... would that be done best with any kind of graver that I can reduce the backdrag?
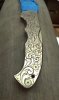
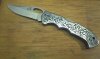
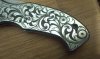
pictures coming
 

dlilazteca

~ Elite 1000 Member ~
Joined
May 10, 2013
Messages
2,659
Location
Laredo, Texas
reasons why you might drag, heel to long, turning work object and not having power on your handpiece ( meaning they should both be working at the same time) don't move your hand holding the handpiece, rotate your work into the handpiece.

How are you tapering your graver?

As far as using rotary handpiece you never or at least i don't ever use it to cut up to the scroll, i remove that with a 90 first, rotary then retouch with 90.

Do you have a casting, you should get one, you will notice that the engravings and background removal are minimal.
 

Dani Girl

:::Pledge Member:::
::::Pledge Member::::
Joined
May 6, 2012
Messages
1,251
Location
NSW, Australia.
lindsay templates

Hi ya'll.

Sorry, my internet died last night before I could put the pictures up.


I'm sharpening gravers with the Lindsay templates, the 116 and the 90. I don't often use the 90 because I can't control it as well yet.

I'll be trying that tip thanks Terrezar

I have noticed that the background is quite shallow in the castings I have. There is a brass knife by Steve lindsay which is quite deep and appeals to me though.

Pictures as promised
 

Attachments

  • burred.jpg
    burred.jpg
    76.8 KB · Views: 454
  • colt not shaded.jpg
    colt not shaded.jpg
    97.2 KB · Views: 462
  • lippy.jpg
    lippy.jpg
    170.8 KB · Views: 451

Haraga.com

~ Elite 1000 Member ~
Joined
Jul 27, 2007
Messages
1,264
Location
Skiff
Dani, it's all smoke and mirrors. There is a lot of relief engraving done quickly and cleanly today simply because not a lot of background material is removed.
 

Dani Girl

:::Pledge Member:::
::::Pledge Member::::
Joined
May 6, 2012
Messages
1,251
Location
NSW, Australia.
lindsay knife


sam

Chief Administrator & Benevolent Dictator
Staff member
Joined
Nov 6, 2006
Messages
10,542
Location
Covington, Louisiana
Dani: Looking at your pics I see areas of heel drag that I also see on my work. A few things to remember:

1.) You will usually get heel drag on inside curves, especially during relief engraving as the background becomes deeper.
2.) When deeply cutting away background on outside curves there's usually not anything behind the graver so the cut is cleaner. Inside curves are what get you.
3.) There are some burs on your outside curves. Recut them and you're good. That's nothing unusual.
4.) Pay particular attention to keeping those sidewalls clean and crisp. That should have been done before stippling as in your last photo.
5.) I often make several passes cleaning up sidewalls, watching what's going on behind my graver the entire time. I'll take short cuts and check for evidence of heel drag on inside curves. When I see it I'll stop and cut from the opposite direction to meet and release the chip. It's often a very slight indication, but it's all the feedback I need to know what's going happen if I just keeping plowing away. It usually means it's going to get worse if I continue in that direction.
6.) When removing background, try to cut in a direction where there's nothing behind the graver except the waste area. Not always possible but do it when you can.
7.) A rotary bur of .4 or .5mm can work inside curves exceptionally well without getting the heel drag that a graver produces.
8.) After the background is removed, a very light deburring with 2000 grit paper will often remove bits of heel drag which appear to be worse than they actually are. I don't see anything in your work to be alarmed about. I see similar things in mine and you simply have more cleanup to do before you stipple the background. My workflow: Outline design>Background removal>Trim sidewalls to perfection and check, double-check, triple check>Debur with 2000 grit paper>Stipple background>Cut shading. And no more deburring or polishing after shading.

Lindsay's knife: I saw this knife years ago and if my memory serves me right, Steve overlaid the surface with a sheet of gold and then cut through it down to the steel below. He obviously did a masterful and exceptionally clean job of it, but I don't think it's done in a similar way to conventional relief engraving as in your photos. You might ask him for clarification on that.
 

Dani Girl

:::Pledge Member:::
::::Pledge Member::::
Joined
May 6, 2012
Messages
1,251
Location
NSW, Australia.
tonights work

Two hours of fine line shading and some screen printing ink on aluminium colt
 

Attachments

  • IMAG5502.jpg
    IMAG5502.jpg
    73.1 KB · Views: 442
  • IMAG5507.jpg
    IMAG5507.jpg
    82.7 KB · Views: 440

Haraga.com

~ Elite 1000 Member ~
Joined
Jul 27, 2007
Messages
1,264
Location
Skiff
I think for the length of time that you have been engraving that you are doing great. Enjoy the ride.
 

Dani Girl

:::Pledge Member:::
::::Pledge Member::::
Joined
May 6, 2012
Messages
1,251
Location
NSW, Australia.
Hey thanks heaps Sam.

It really helps a lot to lay it all out like that and think about it, getting it in order and keeping it clean all the way through makes all the difference.

I see what you mean about coming back at it from the other angle, I did that several times tonight when it was only getting worse, I came back and cut it off from the other side then tried to fix it by making the angle less steep, which worked fairly well. I think the more straight up the side walls the more heel drag I was finding, shallow helps too, so like a knife my side walls have multiple bevels this time.


(I notice because I'm an amateur my background isn't as flat as I'd like and I run into the walls with the stippler, so I often re-cut side walls after stippling and even re-cut background after stippling because it's easier to see the really rough spots then.... bad practice to hide bad engraving, one day I won't have to do it so much... practice practice hey :)

I haven't worked in metal this soft for ages and it's taking me a long time to get used to it again, coarse shading, bad cuts... hopefully it will be ok overall when finished. I think we are like 8hrs into this knife... it's just one of mine for practice
 

sam

Chief Administrator & Benevolent Dictator
Staff member
Joined
Nov 6, 2006
Messages
10,542
Location
Covington, Louisiana
I think it's very nicely done and you have every right to be proud of it. When I see work like this I don't worry at all about the cutting because whatever little issues you're having will eventually be overcome. Design wise it's excellent and that's far more critical. You have a good eye for design and this is going to put you far ahead of those who can't or don't take the time to focus on the art side of engraving. You will leave them in the dust. In fact you already are.
 

Marrinan

~ Elite 1000 Member ~
Joined
Nov 11, 2006
Messages
2,917
Location
outside Albany in SW GA
Dani, I use the same order as Sam, Probably more corrections though. Remember your first cutting is out lining, that's all, a starting point. Conventional background removal goes something like this: cut parallel lines close together at consistent depth and width (witness lines). Turn 90 degrees and cut them again. Use a flat to remove the peaks you have created and then do it again. this continues until you reach the depth you are looking for. For tight places and inside curve you can come from whatever direction you need to keep the heel off you design. At this point I recut my outside lines (the design) rolling the tool toward the inside of my leaves etc. When I stipple I do not stipple to the design, only the background. Should have shiny lines around the entire design. In engraving of Sam and Steve their have been many trips around the design. Wish it could be done in a single pass but that is not going to happen. There is always places to touch-up. Engraving is an art of perseverance and practice.

Your designs, like am mentioned is outstanding.

Heel length. Most people talk about short heels. You can cut only as deep as the heel comes up the sides of the face. Any deeper and the tool will dive. the only way to fix this dive is to come from the other direction with more care. The is the advantage of the parallel heel. Excuse me the Lindsay patented parallel heel.

Remember that when you are going deep you have to come from many directions to get the depth you want. You will come from the point of a of a junction and have to harrow a grave point to cut that little area and only cut an 1/8 of an inch. Your tiny burs can help here but you still may have to make a special tool to finish the cut.

You have one minor design/cutting flaw on an cross over. See if you see it on the knife- Fred
 

Dani Girl

:::Pledge Member:::
::::Pledge Member::::
Joined
May 6, 2012
Messages
1,251
Location
NSW, Australia.
Fred, I presume you are meaning that rather obvious mistake with the gap filler leaf pointing up to the locking mechanism part. I'll see if I can help it hide a little better. :)

It's 193mm long Haraga.

On a side note, got some exciting news today, aparently me and Peter Del Raso won best art knife with the knife I engraved for him... yipeeee
 

Marrinan

~ Elite 1000 Member ~
Joined
Nov 11, 2006
Messages
2,917
Location
outside Albany in SW GA
Dani, You got it. I would caution you on a fix. Nobody but an engraver would notice, and the fix might not work out well. You are an easy person to help, you listen and take what is useful to you and forget the rest. Enjoy you company. Fred
 

Andrew Biggs

Moderator
Joined
Nov 10, 2006
Messages
5,035
Location
Christchurch, New Zealand
Hi Danae

You can make tool that helps to clean up the areas you are trying to fix.

It is a square graver of 90 degrees. Taper uniformly on both sides so the face end up about 1mm wide. Or smaller/bigger if needed.....make the height of the face whatever depth you want to go and then add about another 0.25mm. Lets say 1.5mm but it can be anything. The measurements aren't important as you size to suit.

What this does is act as a depth gauge. So when the top of the face is just above the surface you know that the depth for all areas is about the same.

Secondly, and more importantly.........the sides of the graver become the cutting edge for cleaning up the burrs you are talking about. Just very slightly tilt/angle the graver to the inside of the design and very lightly take a shaving off the wall and that will tidy everything up beautifully. Sometimes it pays to do this by hand pushing in softer metals like Sterling Silver etc.

You will also reduce the dragging by altering your technique slightly. As you cut a tight turn, raise your hand to lift the graver higher. This reduces drag on tight turns considerably.

As Sam says, this is all normal and it's just a matter of cleaning up. As you get more experienced, all of this will become automatic.

Cheers
Andrew
 

Dani Girl

:::Pledge Member:::
::::Pledge Member::::
Joined
May 6, 2012
Messages
1,251
Location
NSW, Australia.
Thankyou

Hey thanks Andrew.

That was very helpful. I will finish that knife off either tonight or in the morning and try grinding up some different gravers as per suggestions on this thread and try these little things that can help to clean up my work.

I really appreciate all the help and the joy of being able to share my pet peeves with you all and I am very thankful for all the help I have recieved.

And thanks Fred, I enjoy your company on here too and I'm sure that could be said for many many other engravers on here too.

Kind regards

Danae.
 

Dani Girl

:::Pledge Member:::
::::Pledge Member::::
Joined
May 6, 2012
Messages
1,251
Location
NSW, Australia.
I scratched the (reach for the stars) image into the lump of brass given to me as a sample today, and did the cronite steel piece with sam's design to practice my cutting. I am still struggling to control a 90 so this is mostly done with a small 116. I used a cold blue paste to colour it. Real easy to use and you can mask off areas with nail polish if you want to.
 
Top