Tutorial for dollar carving thread

Billzach

Elite Cafe Member
Joined
Nov 8, 2006
Messages
510
Location
mayfield, ky
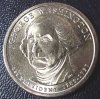
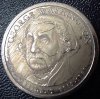
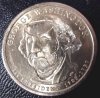
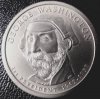
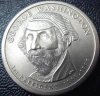
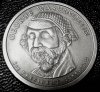
This,ll be the thread you need to check daily for the steps in carving a subject on a 2007 washington dollar, Before i start this thread, Please remember i,ve certain tools i use and have been using many years and enjoy using , but i,m not promoting tools, just what tools i use in carving coins, use the tools you feel best using, the main tools i,ll be using are a #36 and a #42 hand push graver [ no heel] , my gravermax with a monarch handpiece, 3 different grits sanding sticks..Now to the carving of a washington dollar, it,s a lot different from carving a nickel..When i carve a coin, i want it to have a minted look, this means the field has to be smooth, no dips, no grooves, no nicks, etc..The first picture is the host coin before we start to carve it, our subject to be carved will be a Billzach original design i,ve used on new nickels..We,ll call the subject '' The Sea Captain ''..What we want on our finished coin is a new subject on the coin, but no tell-tell marks on the field or face that we recarved washington...
 

Attachments

  • MVC-153F.JPG
    MVC-153F.JPG
    21.8 KB · Views: 159
Last edited:

Billzach

Elite Cafe Member
Joined
Nov 8, 2006
Messages
510
Location
mayfield, ky
This,ll be our first step in carving a 2007 washington dollar, i,ve applied chinese white on the coin to show my scribe marks, this picture will show you a very roughed out image of the cap brim, cap design, beard, ear, etc. yours can be different to a degree, but the lines i,ve scribed will be the ones i cut, don,t start cutting on your coin until you see the next posting later today..
 

Attachments

  • MVC-154F.JPG
    MVC-154F.JPG
    20.7 KB · Views: 197

Billzach

Elite Cafe Member
Joined
Nov 8, 2006
Messages
510
Location
mayfield, ky
The only tool i,ve used so far has been a #36 hand push graver with no heel...I,ve took my push graver and cut inward to the scribe lines and popped the metal out..We,ve the outline of the beard cut, the cap bill, cap brim, bottom of cap behind ear and ear cut ...Now this is very important about carving a new dollar, our field next to the subject has to be the same level as the rest of the field, we,re going for that mint like field..All you new engravers who only have hand push gravers, you can carve this coin too...It,s hard to get a good picture with the bright cuts, but pictures will get better on the next step..
 

Attachments

  • MVC-155F.JPG
    MVC-155F.JPG
    26.5 KB · Views: 190

Billzach

Elite Cafe Member
Joined
Nov 8, 2006
Messages
510
Location
mayfield, ky
Now i,ve cut the beard, sideburns, etc with my monarch handpiece using a small flat graver... Remember keep the field level as the original field meets the subject..We are now ready to start detailing the cap and face and get the gravers marks out of the field and face..i dulled the coin so you can better view the cuts i make since last picture...It,s about 50% completed at this point..
 

Attachments

  • MVC-156F.JPG
    MVC-156F.JPG
    18 KB · Views: 185
Last edited:

Billzach

Elite Cafe Member
Joined
Nov 8, 2006
Messages
510
Location
mayfield, ky
The coin carving is about 75% completed, i,ve added some texture to the bill on the cap, cut some seams in cap, added crowfeet on eyes and worked on field, now i need to give it a few finishing touches, sandblast it and give it a uniform color.. everything and it,s finished..
 

Attachments

  • MVC-157F.JPG
    MVC-157F.JPG
    18.4 KB · Views: 157

Billzach

Elite Cafe Member
Joined
Nov 8, 2006
Messages
510
Location
mayfield, ky
It,s finished, I changed the cap design a little, cleaned the field up somemore, added lines in collar area , sandblasted and added aging to coin...I,m getting a reflection from the light around the eyes, so forgive my picture taking..
 

Attachments

  • MVC-158F.JPG
    MVC-158F.JPG
    20.6 KB · Views: 190

Harpuahound

Elite Cafe Member
Joined
Apr 12, 2007
Messages
218
Location
Ferdinand, IN
You make it look easy. Im curious how much time this would take you, minus the time spent doing the tutorial. Did you use sandpaper on this? and what did you use to "age" the piece?
 

Billzach

Elite Cafe Member
Joined
Nov 8, 2006
Messages
510
Location
mayfield, ky
You make it look easy. Im curious how much time this would take you, minus the time spent doing the tutorial. Did you use sandpaper on this? and what did you use to "age" the piece?
It,s about a 2 hour project, I use sanding sticks purchased from gesswein, try mixing 1/3 gun blue, 1/3 iodine
1/3 water in a bottle and apply with q tip..
 

Billzach

Elite Cafe Member
Joined
Nov 8, 2006
Messages
510
Location
mayfield, ky
There is a coin carving tutorial being conducted on the engraving forum some of you may interested in..[PS] I,m open for questions if you have any on the 2007 dollar carving..
 

Degs

Elite Cafe Member
Joined
Dec 28, 2006
Messages
109
Location
North Yorkshire, England
Hi Bill..... great tutorial.
Question for you, regarding patination/aging on silver dollars, what do you use, and are you sandblasting them.
Just on with my first Morgan.

Degs
 

Billzach

Elite Cafe Member
Joined
Nov 8, 2006
Messages
510
Location
mayfield, ky
Hi Bill..... great tutorial.
Question for you, regarding patination/aging on silver dollars, what do you use, and are you sandblasting them.
Just on with my first Morgan.

Degs
Yes i sandblast my carving, As to the patina i developed a solution about 10 years ago for aging coins after they had been carved, 1/3 gun blue, 1/3 water, 1/3 iodine, a few drops of circuit board cleaner from radio stack, also a piece of chewing tabacco , put all this in a bottle , this solution won,t work well unless you sandblast first..[ps] you can try more or less of each..
 

Sam

Chief Administrator & Benevolent Dictator
Staff member
Joined
Nov 6, 2006
Messages
10,491
Location
Covington, Louisiana
Bill: Many thanks for the informative series of the dollar carving. It is greatly appreciated by all.

I will try some of your aging solution, but Abigail will get VERY angry if I use some of her chewing tobacco. ~Sam
 

monk

Moderator
Staff member
::::Pledge Member::::
Joined
Feb 11, 2007
Messages
10,874
Location
washington, pa
i am convinced that it's my destiny to become a coin carver. with the information that's being so generously
given to us who have the interest- we are so thankful for your generosity and desire to share words don't quite cover the level of gratidude !! thank you so much
 

Tim Wells

~ Elite 1000 Member ~
Joined
Nov 9, 2006
Messages
1,331
Location
Dallas, Georgia
Sam,
Is she a Beechnut gal?:D You two are such cut ups. You gotta spit that stuff out before you sing ya know or it'll sound like gargling.:rolleyes:

Thanks for the lesson Bill!
 

Billzach

Elite Cafe Member
Joined
Nov 8, 2006
Messages
510
Location
mayfield, ky
I have 2 gravermax, 2 monarch handpieces, 2 power hones, 2 microscopes, 2 grs engraving vises, etc in my shop, but if any of you beginners want to carve a coin, all you need is a #36 flat push graver, a mag. visor, glue your coin down and carve carving...My first tools cost less than $3, i used my money that i make on carving coins and invested in better tools and a week in engraving school..
 

Latest posts

Sponsors

Top