
KCSteve
~ Elite 1000 Member ~
The Hobo Nickel Studio
This is cross posted over at my website - click here
This tutorial shows you how to construct a little photography aid I call the Hobo Nickel Studio.
It's inspired by Roland Baptiste's clever idea of turning an empty milk jug into a mini-macro studio. He noted that they're made of a thin, translucent plastic that makes a good light diffuser.
I got to thinking about the fact that the biggest two problems for taking shots of small objects are holding the camera steady and controlling the light (ok, those are the two biggest problems for pretty much all photography). What I wanted was a way to hold the camera steady very near to the minimum focal distance. If it could also help with the light that would be even better.
Then I looked at the empty milk jug in my hand...
Quick summary of this tutorial:
1) Find out where your small camera sits steady on top of a milk jug. If necessary 'adjust' the opening until it does.
2) Figure out your camera's minimum focus distance in macro mode.
3) Cut the milk jug to just a little big longer than that.
Now on to all the gory details!

The first pictures shows everything you need.
From left to right:
1) A camera with a lens small enough to about fit in the opening of a milk jug. One with a macro focus mode is preferred.
2) An empty milk jug. Doesn't have to be from milk, just this kind of translucent plastic. You can use a gallon jug if you prefer.
3) Some way to measure things.
4) Optional - GooGone is a great way to get labels off very cleanly. For this you probably won't need to remove the label but now you know.

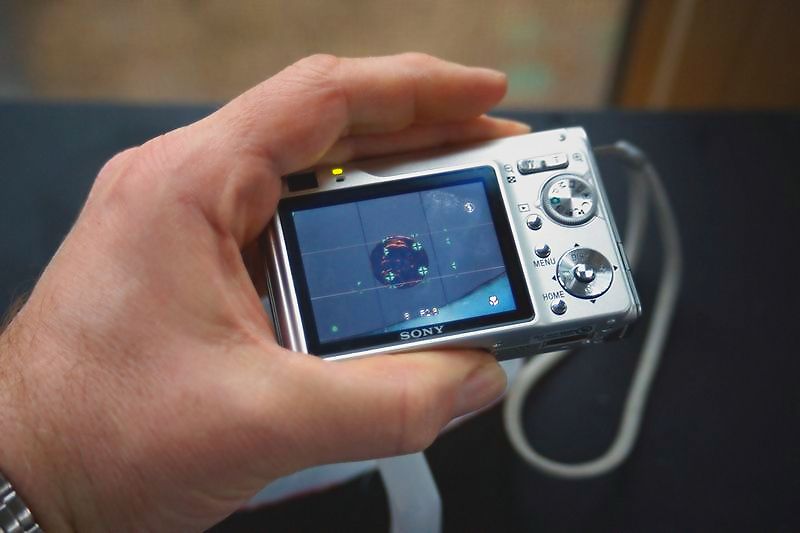
As shown in the next picture, the first step is to find out where you camera sits steadily on the jug. Mine has a 'step' in the lens where the inner section goes in and the next one sits very nicely on the opening.
If you're not that lucky use something sharp and 'adjust' the opening until you can get a flat, stable arrangement.
What you're after is figuring out where on your camera the top of the jug is when the camera is sitting nice and steady up against it. If you have to make the hole bigger and have it go right up against the body that's fine. You just need to know exactly where the camera and the jug meet.

See the little step on the lens?
That's where my camera hits the jug so that's where I'll measure from when I find my minimum focal distance.
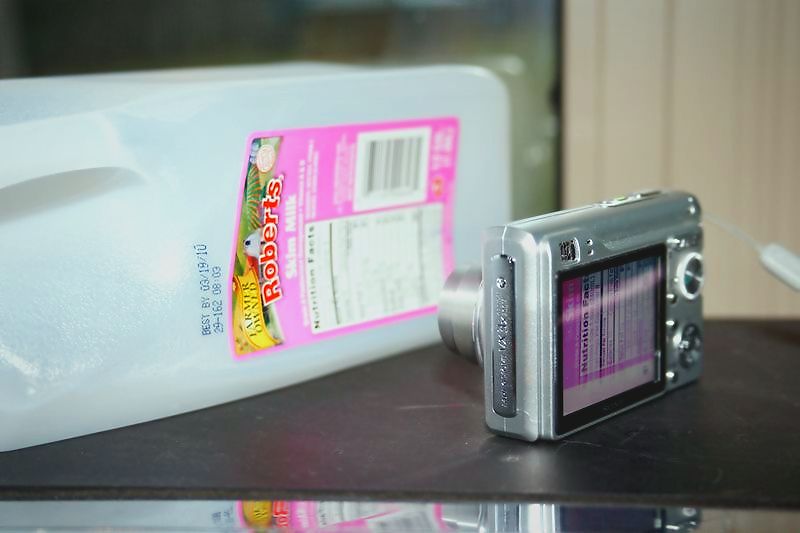
The label of the jug is a handy target for finding the minimum focus distance for your camera.
If you look closely on the display you can see the little flower symbol indicating that I'm in Macro mode. I'm also zoomed all the way out - for macro mode this is actually best because you'll the closest focus this way. Your camera may differ so run some tests.
To find your closest focus point just set the camera and a target up like this, move the camera up way too close and press the shutter down half-way. It should fail to focus. Now move back just a touch and try again. Repeat until it does focus and now you're set to just as close as you can be and still focus.

Now I'm measuring to find out what that minimum focal distance actually is.
This is where you need to know where your camera and the jug meet up.
Since on my camera it's that step on the lens my distance is right about 2.5"
Notice that I've marked the jug at 2.75".
You need that extra space - unless you're only taking pictures of the surface of large, flat objects.
Whatever I put under this thing is going to have some height to it and if I cut my jug to the exact length then I probably wouldn't be able to focus on it. By leaving myself some space I allow for my subject to have some thickness to it.
How much space you leave isn't critical, but it does matter. Too little and you'll find yourself unable to focus on things. Too much and you're 'wasting' some of your image because you'll have to crop the image too much to 'zoom in' on your subject.
Try to guess about how far up from the surface the top of your subject is going to be and allow just over that. If you'll be using this to take pictures of work in progress on your bench don't forget to allow for any distance between whatever the bottom of the jug will rest against and the top of your piece.

This is why I didn't really need to clean the lable off of this jug - the part I needed didn't get down to where the label was.
That little piece of jug is what we were after.

Here's how you use it.
Set your object down, set the HNS over it, and set your camera over the HNS.
Here you can see how the camera has focused right on the subject.
You can even see a couple of key settings on the camera.
The little symbol in the upper right shows that I've turned off the flash - it won't work right through the jug and I won't be able to predict how it would look. Better to just use lamps or other 'hot' lighting to get the look I want.
The little flower in the lower right shows that I'm in macro mode.

This a shot done without the Hobo Nickel Studio.
Not bad but I've got a lot of practice holding still.
If you want to see the full-size, straight from the camera file (about 4M) click here

Zoomed in.
Ok, technically just cropped but since I did that before resizing for the web it's effectively zoomed in.
Still not bad but there's a little softness - and like I said, I have a lot of practice taking shots like this unsupported.

Here's the shot with the Hobo Nickel Studio.
Even like this you can see the image is a bit crisper and the lighting's better.
If you want to see the full-size, straight from the camera file (about 4M) click here
The little bits of the jug (upper left corner, along the bottom) are due to the shape of the jug. If you find one without a handle you can avoid this. I just frame to allow for cropping it out.

Zooming (yeah, cropping) the 'with' image you can see that it's both sharper and has smoother lighting.
It was a lot easier to take this shot too - no bracing myself, stretching my pinky's down toward a table, holding my breath - all the usual 'no tripod' tricks. Just slap everything down and hit the shutter.
This is cross posted over at my website - click here
This tutorial shows you how to construct a little photography aid I call the Hobo Nickel Studio.
It's inspired by Roland Baptiste's clever idea of turning an empty milk jug into a mini-macro studio. He noted that they're made of a thin, translucent plastic that makes a good light diffuser.
I got to thinking about the fact that the biggest two problems for taking shots of small objects are holding the camera steady and controlling the light (ok, those are the two biggest problems for pretty much all photography). What I wanted was a way to hold the camera steady very near to the minimum focal distance. If it could also help with the light that would be even better.
Then I looked at the empty milk jug in my hand...
Quick summary of this tutorial:
1) Find out where your small camera sits steady on top of a milk jug. If necessary 'adjust' the opening until it does.
2) Figure out your camera's minimum focus distance in macro mode.
3) Cut the milk jug to just a little big longer than that.
Now on to all the gory details!
The first pictures shows everything you need.
From left to right:
1) A camera with a lens small enough to about fit in the opening of a milk jug. One with a macro focus mode is preferred.
2) An empty milk jug. Doesn't have to be from milk, just this kind of translucent plastic. You can use a gallon jug if you prefer.
3) Some way to measure things.
4) Optional - GooGone is a great way to get labels off very cleanly. For this you probably won't need to remove the label but now you know.
As shown in the next picture, the first step is to find out where you camera sits steadily on the jug. Mine has a 'step' in the lens where the inner section goes in and the next one sits very nicely on the opening.
If you're not that lucky use something sharp and 'adjust' the opening until you can get a flat, stable arrangement.
What you're after is figuring out where on your camera the top of the jug is when the camera is sitting nice and steady up against it. If you have to make the hole bigger and have it go right up against the body that's fine. You just need to know exactly where the camera and the jug meet.
See the little step on the lens?
That's where my camera hits the jug so that's where I'll measure from when I find my minimum focal distance.
The label of the jug is a handy target for finding the minimum focus distance for your camera.
If you look closely on the display you can see the little flower symbol indicating that I'm in Macro mode. I'm also zoomed all the way out - for macro mode this is actually best because you'll the closest focus this way. Your camera may differ so run some tests.
To find your closest focus point just set the camera and a target up like this, move the camera up way too close and press the shutter down half-way. It should fail to focus. Now move back just a touch and try again. Repeat until it does focus and now you're set to just as close as you can be and still focus.
Now I'm measuring to find out what that minimum focal distance actually is.
This is where you need to know where your camera and the jug meet up.
Since on my camera it's that step on the lens my distance is right about 2.5"
Notice that I've marked the jug at 2.75".
You need that extra space - unless you're only taking pictures of the surface of large, flat objects.
Whatever I put under this thing is going to have some height to it and if I cut my jug to the exact length then I probably wouldn't be able to focus on it. By leaving myself some space I allow for my subject to have some thickness to it.
How much space you leave isn't critical, but it does matter. Too little and you'll find yourself unable to focus on things. Too much and you're 'wasting' some of your image because you'll have to crop the image too much to 'zoom in' on your subject.
Try to guess about how far up from the surface the top of your subject is going to be and allow just over that. If you'll be using this to take pictures of work in progress on your bench don't forget to allow for any distance between whatever the bottom of the jug will rest against and the top of your piece.
This is why I didn't really need to clean the lable off of this jug - the part I needed didn't get down to where the label was.
That little piece of jug is what we were after.
Here's how you use it.
Set your object down, set the HNS over it, and set your camera over the HNS.
Here you can see how the camera has focused right on the subject.
You can even see a couple of key settings on the camera.
The little symbol in the upper right shows that I've turned off the flash - it won't work right through the jug and I won't be able to predict how it would look. Better to just use lamps or other 'hot' lighting to get the look I want.
The little flower in the lower right shows that I'm in macro mode.
This a shot done without the Hobo Nickel Studio.
Not bad but I've got a lot of practice holding still.
If you want to see the full-size, straight from the camera file (about 4M) click here
Zoomed in.
Ok, technically just cropped but since I did that before resizing for the web it's effectively zoomed in.
Still not bad but there's a little softness - and like I said, I have a lot of practice taking shots like this unsupported.
Here's the shot with the Hobo Nickel Studio.
Even like this you can see the image is a bit crisper and the lighting's better.
If you want to see the full-size, straight from the camera file (about 4M) click here
The little bits of the jug (upper left corner, along the bottom) are due to the shape of the jug. If you find one without a handle you can avoid this. I just frame to allow for cropping it out.
Zooming (yeah, cropping) the 'with' image you can see that it's both sharper and has smoother lighting.
It was a lot easier to take this shot too - no bracing myself, stretching my pinky's down toward a table, holding my breath - all the usual 'no tripod' tricks. Just slap everything down and hit the shutter.
Last edited:
")


