JBrandvik
Elite Cafe Member
Hi Bill,
Tira is definately correct in steering you toward a narrower graver. The force necessary to push the graver into the metal and keep it moving forward is proportional to the width of the graver. This should be relatively easy to accomplish by honing the width of your screwdriver/graver with a sharpening stone.
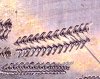
The cigarette case in the photo appears to have been wriggled using a technique refered to as 'low wriggle' where the graver is held lower to the object. The low method creates more of a zipper appearance whereas the higher angle of attack gives more of a zip-zag appearance.
I also think your nail/graver idea has merrit as long as you have access to enough heat to be able to temper the nail after you have given it the rough shape of a flat graver. The force and the friction of low wriggle cutting will dull the outer edges quickly otherwise. Its very difficult to execute a clean wriggle cut with a dull graver so know that your sharpening-time will be a good investment.
Finally, I would add that rhythum is more important than speed. When I first started learning to wriggle cut, I had the idea that I needed to buzz like a sewing machine. If it helps you to count out "One, two, one, two" then do so as slowly as you feel comfortable. The key again is to keep a consistent rhythum.
Here is a quote from Scott Pilkington taken from a previous thread on iGraver which explains the technique of the low wriggle better than any I have ever come across.
Good luck, Bill.
Tira is definately correct in steering you toward a narrower graver. The force necessary to push the graver into the metal and keep it moving forward is proportional to the width of the graver. This should be relatively easy to accomplish by honing the width of your screwdriver/graver with a sharpening stone.
The cigarette case in the photo appears to have been wriggled using a technique refered to as 'low wriggle' where the graver is held lower to the object. The low method creates more of a zipper appearance whereas the higher angle of attack gives more of a zip-zag appearance.
I also think your nail/graver idea has merrit as long as you have access to enough heat to be able to temper the nail after you have given it the rough shape of a flat graver. The force and the friction of low wriggle cutting will dull the outer edges quickly otherwise. Its very difficult to execute a clean wriggle cut with a dull graver so know that your sharpening-time will be a good investment.
Finally, I would add that rhythum is more important than speed. When I first started learning to wriggle cut, I had the idea that I needed to buzz like a sewing machine. If it helps you to count out "One, two, one, two" then do so as slowly as you feel comfortable. The key again is to keep a consistent rhythum.
Here is a quote from Scott Pilkington taken from a previous thread on iGraver which explains the technique of the low wriggle better than any I have ever come across.
This wiggle looks nothing like a high wiggle which is essentially a zigzag line. the low wiggle looks more like a zipper to me, with interlocking teeth, made by the bright cuts. To do the low wiggle, you need some good wrist and forearm strength. You will have to build up to it if you do much of it at all.
The graver is a flat graver with NO heel. It (the bottome of the graver)can be bright polished if you want bright cuts in the brass. I say brass, cause that is mostly what you see in banjos, you could do it in nickel silver as well, but I would not attempt it in steel. I would put about a 45 degree face on the heeless flat graver. with the graver at about a 15 degree attack, push it in as far as you can on the front right side of the graver. When you get it pushed into the brass until it will not go anymore, rock the graver from right to left, so that the burr you just made breaks off more or less straight and you start pushing in as deep as you can with the left side until it stops because you are too deep, rotate the front the graver back over the right side and start the process all over again. Do it fast and in an equal rhythm and you will have a good looking zipper wiggle. Different width gravers can be used of course for different effects, but the wider the flat is the harder your wrist is going to have to work to break the burr as you roll from left to right, right to left.
__________________
Scott Pilkington
Good luck, Bill.